1. Line a baking sheet with foil and spread the vanilla wafer cookies onto the baking sheet. Remove any broken pieces.
2. Fill a pastry bag or resealable plastic bag with the cream cheese icing. Snip off a corner of the pastry bag and pipe a generous teaspoon or so of icing onto the flat part of a cookie; immediately sandwich with another cookie. Repeat with remaining vanilla wafer cookies until you have a bunch of mini cannoli sandwiches.
3. Freeze cannoli sandwich bites for about 1 hour or until firm.
4. Melt CANDIQUIK® Coating in Melt & Make™ Microwaveable Tray according to package directions.
5. Dip each cannoli bite into melted coating about halfway, then dredge or sprinkle with the mini chocolate chips. Allow the CandiQuik to set before serving. Store leftovers at room temperature for a couple days.
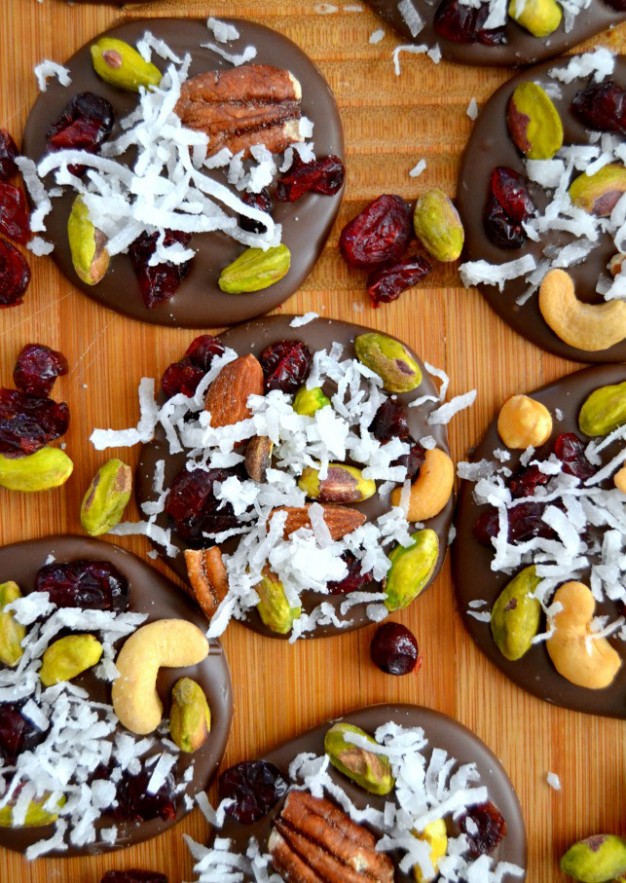
1. Line two baking sheets with parchment paper. Set aside.
2. Melt CANDIQUIK® Coating in Melt & Make™ Microwaveable Tray according to package directions.
3. Drop heaping ¼ cup-sized portions of melted CANDIQUIK® Coating onto the baking sheets, using back side of a spoon to gently create a flattened circle of chocolate. Immediately top with an assortment of trail mix toppings. Allow to cool completely.
1. Preheat oven to 350°F. Line two baking sheets with silicone liners; set aside.
2. In a large bowl, combine cake mix, eggs, butter and strawberry extract until blended. Drop rounded Tablespoonfuls of dough onto baking sheets 1-2″ apart.
3. Bake for 10-12 minutes, rotating pans halfway through baking time to ensure even cooking. Cool completely.
4. Melt CANDIQUIK® Coating in Melt & Make™ Microwaveable Tray according to package directions.
5. Dip cookies halfway into melted coating, then return to baking sheet and immediately sprinkle with your Valentine’s sprinkles. Allow the chocolate to set before serving.
1. In a small saucepan, over medium-high heat, combine cream and spices. Cook, stirring frequently, until mixture comes to a rolling boil.
2. Place chocolate chips in a medium bowl. Pour cream mixture over chocolate chips and let sit for 2 minutes. Stir until all chocolate is melted and mixture is smooth.
3. Add butter to warm ganache and mix well. Place in refrigerator for 1-2 hours until firm.
4. Using a teaspoon, roll ganache into 1-inch sized balls. Return to the refrigerator and chill until firm.
5. Melt CANDIQUIK® Coating in Melt & Make™ Microwaveable Tray according to package directions.
6. Dip ganache balls in melted coating; allow excess coating to drip off.
7. Place on wax paper and allow to set completely.
OPTIONAL:
Melt Vanilla CANDIQUIK® Coating, mix with spices to taste, and drizzle over truffles.
1. Preheat oven to 300°F. Line two baking sheets with parchment paper and set aside.
2. In a medium bowl, beat together first 5 ingredients until smooth. Slowly add in flour and mix thoroughly.
3. On a lightly floured surface, roll dough until ¼-inch thick. Use a 2-inch cookie cutter or cut into squares and place 1-2 inches apart on baking sheets.
4. Bake 19-22 minutes or until center of cookie is firm. Cool completely on wire rack.
5. Melt CANDIQUIK® Coating in Melt & Make™ Microwaveable Tray according to package directions. Mix in coffee grounds.
6. Dip ½ of each cookie (or drizzle for a different look!) in melted coating and allow it to set on wax or parchment paper.
2. In a large bowl, beat cake mix, buttermilk, eggs, and butter until well mixed.
3. Pour batter into pastry or Ziploc® bag. Cut a corner off Ziploc® bag.
4. Pipe batter into a lightly greased donut pan; filling molds ⅔ full.
5. Bake for 5-9 minutes until the top springs back when touched and a toothpick comes out clean. Let cool completely on wire rack.
6. Melt CANDIQUIK® Coating in Melt & Make™ Microwaveable Tray according to package directions. Add up to 5 drops of lemon oil to melted coating or until your desired flavor has been reached.
7. Dip the top half of each donut in coating, return to wire rack and sprinkle with almonds.
1. In a small saucepan, over medium-high heat, combine cream and thyme. Cook, stirring frequently, until mixture starts to simmer. Remove from heat and let sit covered for 15 minutes.
2. Strain cream to remove thyme and return to saucepan. Stir in honey and salt and cook over medium-high heat until cream mixture comes to a rolling boil.
3. Place chocolate chips in a medium bowl. Pour cream mixture over chocolate chips and let sit for 2 minutes. Stir until all chocolate is melted and mixture is smooth.
4. Add butter to warm chocolate mixture and mix well. Place in refrigerator for 1-2 hours until firm.
5. Using a teaspoon, roll ganache into 1-inch sized balls. Return to the refrigerator and chill until firm.
6. Melt CANDIQUIK® Coating in Melt & Make™ Microwaveable Tray according to package directions.
7. Dip ganache balls in melted coating; allow excess coating to drip off.
8. Place on wax paper, garnish with fresh thyme, and allow to set completely.
2. Melt Chocolate CANDIQUIK® Coating in Melt & Make™ Microwaveable Tray according to package directions.
3. Dip cookies completely into melted coating with a fork, allowing excess coating to drip off. Gently slide cookie onto baking sheet to set.
4. Melt Vanilla CANDIQUIK® Coating in Melt & Make™ Microwaveable Tray according to package directions. Pour melted coating into a piping bottle or Ziploc® bag, and clip a corner.
5. Pipe stitches onto each football cookie. Allow stitching to dry before serving cookies.
2. Crumble cake into a large bowl. Add frosting and mix thoroughly.
3. Using tablespoon-sized scoops, make a nest out of the cake mix to form around each cherry. More frosting may be added if the mixture is too dry to form.
4. Melt CANDIQUIK® Coating in Melt & Make™ Microwaveable Tray according to package directions.
5. Dip cake balls in melted coating, place on wax paper to set. Add sprinkles if desired.
6. Once cake balls have set, dip tip of cherry stems in melted coating and coat with sprinkles.
2. Cut CANDIQUIK® Coating block in half. Set ½ aside for later and melt ½ in microwave for 45 seconds. Stir and continue to melt in 15 second increments until melted, stirring between increments.
3. Add peanut butter to melted coating and stir well.
4. Mix in sugar cone crumbs and spread in the bottom of a springform pan. Refrigerate for 10 minutes to set.
5. Spread softened ice cream over crust and smooth the top. Cover and place in freezer to allow ice cream to firm up until ready to serve, at least 1 hour.
6. When ready to serve, remove sides of springform pan and sprinkle with peanuts. Melt remaining half block of CANDIQUIK® Coating as directed above and drizzle over the top and sides of pie.
1. In large bowl, combine coconut, pineapple, and sweetened condensed milk; mix well.
2. Add flour; mix well.
3. Add vanilla and rum flavor; mix well.
4. Refrigerate mixture for 30 minutes.
5. Preheat oven to 350°F and scoop macaroon mixture by the tablespoonful onto a parchment paper lined baking sheet. Make a small indent on the top of each macaroon and gently press a maraschino cherry in the indentation. Bake for 15-20 minutes.
6. Remove from oven and allow to cool on wire rack.
7. Melt CANDIQUIK® Coating in Melt & Make™ Microwaveable Tray according to package directions. Dip bottom of each macaroon in coating and place on parchment paper to set.
1. Break off one square of CANDIQUIK® Coating and put aside.
2. Melt remaining CANDIQUIK® Coating in Melt & Make™ Microwaveable Tray according to package directions.
3. Add green candy color one drop at a time until desired color is reached.
4. Dip each cookie into melted coating using a fork, allowing excess to drip off. Place on wax or parchment paper to set.
5. Melt remaining block of CANDIQUIK® Coating in a mug 20 seconds at a time until melted, stirring between intervals and pour into sandwich size Ziploc® bag. Cut a small corner off the bag to pipe lines and numbers on cookies. Allow to set completely and store in an airtight container.
1. In a large food processor, crush the pecan shortbread cookies until finely ground crumbs appear. Pour the cookie crumbs into a large bowl.
2. Combine the cookie crumbs, cream cheese and maple syrup until a soft dough has formed and no more crumbs remain along the bottom of the bowl.
3. Form 1″ balls of dough and place on foil-lined cookie sheet. Freeze the truffles for about 20-30 minutes or until firm.
4. Melt Vanilla CANDIQUIK® Coating Melt & Make™ Microwaveable Tray according to package directions.
5. Stir cinnamon into melted CANDIQUIK® Coating. Gently coat each truffle using a fork, and place on prepared cookie sheet to set. Immediately top each truffle with a pecan half and allow coating shell to harden before serving.
1. Line a baking sheet with foil or a silicone liner.
2. Gently stick a lollipop stick about halfway through the bottom of a Rice Krispie Treat and set the treats onto the baking sheet.
3. Melt CANDIQUIK® Coating in Melt & Make™ Microwaveable Tray according to package directions.
4. Coat cookies in the melted coating. Return the cookies to the baking sheet and gently attach candy corn in a half-moon shape around the top arc of the cookie to create the turkey headdress. Allow the cookies to harden.
5. While cookies set, coat Rice Krispie® Pops in melted coating. Allow excess coating to drip off, then gently press the Rice Krispie® Pop onto the cookie headdress. Quickly attach eyes and a candy corn nose to the turkey and allow the pops to set.
1. Chop entire block of CANDIQUIK® Coating into small pieces.
2. In a medium saucepan, heat ½ cup milk over medium-low heat until simmering. Once simmering, add chopped CANDIQUIK® Coating and stir constantly until all chunks are melted.
3. Remove from heat and pour mixture into cookie cutters and mix in any additional ingredients. Allow to set in refrigerator.
1. Combine cake mix and 12 oz champagne (no eggs, oils, or water) and mix well. Bake according to directions.
2. Cream butter with mixer and gradually add powdered sugar until mixed well. Stir in ⅛ cup champagne.
3. Crumble cooled cake into a large bowl. Add frosting and mix thoroughly with hands.
CAKE POPS:
1. Roll cake and frosting mixture into 1″ sized balls. Chill for approximately 30 minutes in the refrigerator.
2. Melt CANDIQUIK® Coating in Melt & Make ™ Microwaveable Tray according to package directions.
3. Insert a lollipop stick into each cake ball. You can dip the lollipop stick in a small amount of coating before inserting into the cake ball if you have issues with it falling off the stick.
4. Dip cake pops or balls in melted CANDIQUIK® Coating; allow excess coating to drip off and place on wax paper or in the Styrofoam block. Decorate with sprinkles if desired and allow to set.
CAKE HEART BITES:
1. Spoon a small amount of melted coating into each mold cavity, rotating to coat the bottom and sides and allow to set.
2. Press cake mixture into chocolate-coated molds until about ¾ full. Top with additional coating.
3. Once completely set, pop cake-filled chocolates out of heart mold. Repeat until all cake and CANDIQUIK® Coating is gone.
1. Prepare and bake cake mix as directed on box. Allow to cool slightly, at least 30 minutes.
2. Crumble trimmed* cake into a large bowl. Add frosting and mix thoroughly with hands (*see notes below).
3. Chill mixture approximately 2 hours in the refrigerator.
4. Measure cake mixture and roll into 1” sized balls. Place on a wax paper lined baking sheet. You may need to place the cake balls back in the fridge for 20-30 minutes, allowing them to firm up.
5. Insert a lollipop stick into each cake ball. You can dip the lollipop stick in a small amount of coating before inserting into the cake ball if you have had issues with it falling off the stick. *Tip: remove a few cake pops at a time to dip, storing the others in the fridge until ready.
6. Melt CANDIQUIK® Coating in Melt & Make™ Microwaveable Tray according to package direction.
7. Split melted coating into several mugs. Add oil or powder based food coloring; stir until blended.
8. Dip cake pops in melted CANDIQUIK® Coating; allow excess coating to drip off (hold at a ~30 degree angle allowing the coating to drip off the bottom and not drip on the stick) by tapping the stick and place in the Styrofoam block to set.
9. Sprinkle each cake pop with matching sugar crystal sprinkles.
NOTES:
For smooth cake balls, trim off the edges and bottom of the cake. Mix crumbled cake thoroughly with frosting. For best results, use your hands to thoroughly combine the cake and frosting together.
1. Break off ¼ of the CANDIQUIK® Coating bar and set aside in a mug or small bowl.
2. Melt remaining CANDIQUIK® Coating in Melt & Make$trade; Microwavable Tray according to package directions. Once melted, add orange candy color until desired color is reached.
3. Coat Nutter Butter cookies in orange coating, and set on wax paper. Add two candy eyes, and allow to dry.
4. Melt ¼ set aside in a mug or small bowl for 45 seconds followed by 15-second increments, stirring between each increment. Once melted, add yellow candy color until desired color is reached.
5. Pour yellow coating into a pastry bag or Ziploc® bag with a small corner cut off. Pipe Lorax mustache and eyebrows onto cookies and allow to dry.
1. Bake cake according to package directions, replacing water in recipe with equal amounts red wine.
2. Cream butter with mixer and gradually add powdered sugar until mixed well. Stir in ¼ cup red wine.
3. Crumble cooled cake into large bowl. Add ½ cup frosting and mix thoroughly. Add more frosting if cake is crumbly and won’t stick together.
4. Roll cake and frosting mixture into 1″ sized balls. Chill for approximately 30 minutes in the refrigerator.
5. Melt Chocolate CANDIQUIK® Coating in Melt & Make%trade; Microwaveable Tray according to package directions.
6. Dip cake bites in melted CANDIQUIK® Coating and allow excess coating to drip off before placing on wax paper to set. (I like to use two forks for this so excess coating can easily drip through the tines)
2. Melt Vanilla CANDIQUIK® in Melt & Make™ Microwaveable Tray according to package directions.
3. Place a few blueberries at a time directly in the tray and use a fork to lift out, shaking off the excess coating before placing on wax paper to dry.
Store in an airtight container in the fridge for up to 5 days.
2. Melt butter in a deep pan over medium heat; add marshmallows and stir until melted.
3. Add cereal and mix until evenly coated.
4. Spread cereal mixture evenly into baking dish.
5. Once cooled, turn out onto a cutting board; cut into desired shapes using cookie cutters and insert popsicle stick.
6. Melt Vanilla CANDIQUIK® in Melt & Make™ Microwaveable Tray according to package directions. Dip cereal pops into Vanilla CANDIQUIK® and set on wax paper to dry.
1. Spread a small amount of peanut butter onto each Mini Nilla Wafer.
2. Slice bananas into chunks approximately ¼” thick.
3. Press one banana slice between two Nilla Wafer cookies; place in freezer for 10-15 minutes.
4. Melt CANDIQUIK® Coating in Melt & Make™ Microwaveable Tray according to package directions.
5. Dip half of each cookie sandwich into CANDIQUIK and place on wax paper to dry. Sprinkle.
Notes: Prepare immediately prior to eating as the cookie will begin to soften (and the bananas will begin to brown). You can freeze these treats and eat frozen (however, do not attempt to thaw and then eat, as the banana will become mushy).
1. Combine coconut, oats, sweetened condensed milk, and honey in a food processor.
2. Blend for 1 minute or until thoroughly combined.
3. Transfer coconut mixture into a medium bowl and fold in chocolate chips.
4. Using a coffee scoop or melon baller, scoop mixture and roll into a tight ball.
5. Melt Chocolate CANDIQUIK® Coating in Melt & Make™ Microwaveable Tray and transfer to a heavy-duty plastic bag, with a tiny hole cut off one corner. Drizzle coconut bites with chocolate coating.
1. Melt Chocolate CANDIQUIK® in Melt & Make™ Microwaveable Tray according to directions on package.
2. Break each graham cracker square in half. Using a spoon, dip graham crackers in Chocolate CANDIQUIK® and place on wax paper; sprinkle if desired. Let dry.
3. Using a dab of Chocolate CANDIQUIK® in between the graham crackers; top one graham cracker with a marshmallow and press the other graham cracker on top, creating a sandwich.
Melt Vanilla CANDIQUIK® Coating in Melt & Make™ Microwaveable Tray according to directions on package. Stir in peanut butter until well mixed.
Gently pull apart each Oreo cookie; dip the top of the lollipop stick in the coating and press the lollipop stick in the center of the cookie halves. Repeat with all cookies.
Pour CandiQuik coating into a deep cup (this makes it easier to dip + I use a disposable cup for ease of clean-up).
Dip the cookie lollipops in melted coating; allow excess coating to drip off and place on wax paper.
Immediately sprinkle with mini chocolate chips; let dry.
1. In a medium bowl, mix crust ingredients until well incorporated. Press into the bottom of glass jars; refrigerate until ready to fill.
2. Melt CANDIQUIK® Coating in Melt & Make™ Microwaveable Tray according to directions on package.
3. In a large bowl combine softened cream cheese, CANDIQUIK® and vanilla pudding powder, mix until well blended.
4. Fold in whipped topping, half of a container at a time and mix until well blended.
5. Carefully spoon mixture into a piping bag or a large plastic bag with one corner snipped off and pipe into each jar, covering the bottom 1/3 of the jar. Add a layer of fresh strawberries and blueberries.
6. Pipe another layer of cream pie into the jar and top with berries. Refrigerate until ready to serve.
1. Melt Vanilla CANDIQUIK® Coating in Melt & Make™ Microwaveable Tray according to package directions.
2. Dip pretzel sticks in coating and place on wax paper to dry.
3. Once almost dry, place 5 M&M candies on top of the pretzel to form the body and head of the butterfly. Press two brown jimmies on the front of the pretzel as the antennas.
4. Dip two pretzel twists in vanilla coating and press one pretzel on each side of the pretzel stick; let dry.
1. Prepare and bake cake mix as directed on box; cool completely.
2. Crumble cake into a large bowl. Add frosting and mix thoroughly.
3. Roll mixture into 1″ sized balls. Chill for approximately 1-2 hours in the refrigerator.
4. Melt CANDIQUIK® Coating in Melt & Make™ Microwaveable Tray according to directions on package. Add 1 packet of strawberry flavored Frosting Creations to each package of Vanilla CANDIQUIK Coating; stir until blended.
5. Insert a lollipop stick into each cake ball. Dip cake pops in coating; allowing the excess coating to drip off. Place on wax paper and sprinkle. Let dry.
Tip: If cake balls become too soft or are not holding their shape while being dipped, place back in the refrigerator for 20-30 minutes.
2. Melt CANDIQUIK® Coating in Melt & Make™ Microwaveable Tray according to directions on package.
3. Dip 1″ graham cracker squares in CANDIQUIK®; place on wax paper to set. Place a round sprinkle in the center of each graham cracker before coating sets.
4. Once dry; pipe on the tassel with cake writing icing.
5. Place unwrapped peanut butter cups upside-down. Use a dab of CANDIQUIK® to affix dried graham cracker squares to bottoms of peanut butter cups.
1. Prepare and bake cake mix as directed on box; cool completely.
2. Crumble cake into a large bowl. Add frosting and mix thoroughly.
3. Roll cake mixture into medium sized ovals and form into the shape of a jalopeño pepper. Chill for approximately 1-2 hours in the refrigerator.
4. Melt CANDIQUIK® Coating in Melt and Make Microwaveable Tray™ according to directions on package. Add green food coloring (oil or powder based) until desired color is established.
5. Dip cake balls in CANDIQUIK®; allow excess coating to drip off and place on wax paper to set.
6. Before set, press and hold a pretzel piece (approx. 3/4”) on the end of the cake bite as a stem.
1. Heat approximately 1/2 cup oil in a large fry pan. (Dice fruit while oil is heating.)
2. Add 4-5 tortillas to hot oil and fry until golden, use tongs to flip tortillas to brown each side (takes about 30 sec- 1 min).
3. Place chips into a large bowl and sprinkle immediately with cinnamon-sugar.
4. Repeat with remaining tortillas. Add additional oil when needed.
5. Melt CANDIQUIK® in Melt and Make Microwaveable Tray™ according to package directions. Dip each tortilla in chocolate coating and place on a large serving plate.
6. Top tortilla chips with fresh fruit and drizzle with additional chocolate coating.
Suggestion: serve with cinnamon-infused ice cream or whipped cream.
2. Melt CANDIQUIK® Coating in Melt & Make™ Microwaveable Tray™ according to directions on package. Stir in both packets of the orange creme Frosting Creations powder.
3. Holding strawberries by their stem, dip in CANDIQUIK® coating and place on wax paper to dry.
4. Using a spoon (or a piping bag), drizzle strawberries with excess coating to create horizontal lines.
1. Mix the corn syrup, butter, vanilla and salt in a large bowl with a mixer until smooth. Gradually add powdered sugar, mixing by hand after each addition. Stir until creamy.
2. Remove about 1/3 of the sugar mixture and place in a small bowl. Add the yellow food coloring; mix well.
3. Cover both mixtures and place in the freezer for 1-2 hours or until firm.
4. Remove the yellow mixture from the freezer and roll into marble-sized balls and place on a lightly greased baking sheet. Place back in the freezer for 20 minutes.
5. Wrap a small amount of the white filling around the yellow balls. Form into the shape of eggs and place on the lightly greased baking sheet. Repeat until done and return to the freezer for 20-30 minutes.
6. Melt CANDIQUIK® in Melt & Make™ Microwaveable Tray according to the package directions. With a spoon, coat creme eggs in CANDIQUIK® and place on wax paper to set.
TIP: If mixture gets too sticky or is not holding it’s shape, return to the freezer until very firm.
FOR MODELING CHOCOLATE:
1. Melt 8 oz. of CANDIQUIK® Coating in the Melt & Make™ Microwaveable Tray according to package directions. Add green food coloring and stir until completely combined. (Let the melted CANDIQUIK® sit while preparing the corn syrup, this will allow it to cool slightly but still remain fluid.)
2. In a small saucepan, heat corn syrup until it just begins to boil.
3. Pour the heated corn syrup on top of the CANDIQUIK® and mix with a rubber spatula until it combines and forms a smooth paste.
4. Cover with plastic wrap and refrigerate, allowing the modeling chocolate to firm (at least 2 hours and preferably overnight).
5. Remove from fridge and knead until it becomes soft and pliable. Form cactus arms.
6. Melt remaining (8 oz.) Vanilla CANDIQUIK® and add green food coloring.
7. Dip pretzel rods in coating and place on wax paper. Immediately attach cactus arms. Sprinkle if desired.
(Store any unused modeling chocolate in refrigerator.)
1. Melt Vanilla CANDIQUIK® Coating in Melt & Make™ Microwaveable Tray according to package directions.
2. Stir in green food coloring until desired color is established.
3. Dip OREO® cookies in melted coating and place on wax paper to dry.
4. Before completely dry, attach two candied eyes and press a heart-shaped sprinkle on the edge of the cookie as the tongue. Sprinkle the top of the cookie with green confetti sprinkles if desired.
5. Break apart pretzel twists and use the U-shaped pieces as the legs.
6. Dip pretzel pieces in candy coating and press onto the back edge of the cookie as the hind legs; let dry.
7. Place remaining candy coating in a heavy-duty plastic bag with a tiny corner cut off (or piping bag) and pipe little feet on a flat surface covered with wax paper.
8. Once hardened, carefully peel feet away from wax paper and use a dab of candy coating to attach to frog cookie. Use edible marker to draw mouth.
1. Cut each marshmallow in half diagonally. These will form the bunny ears. Sprinkle with pink decors onto the sticky side of the marshmallow (for best results, press the sticky side of the marshmallow into the sprinkles).
2. Melt Vanilla CANDIQUIK® Coating in Melt & Make™ Microwaveable Tray according to the directions on the package.
3. Dip about ¾ of each pretzel rod in the Vanilla CANDIQUIK® and place on wax paper.
4. Before CANDIQUIK® Coating has set, press the marshmallow ears on the top of the pretzel, holding in place until set, and press one heart-shaped sprinkle on as the nose.
5. Once dry, draw two dots for eyes with black edible marker or cake writing icing.
1. Melt Vanilla CANDIQUIK® Coating in Melt & Make™ Microwaveable Tray according to directions on package.
2. Add ½ cup of the chopped OREO cookies into the tray and stir to combine. Pour mixture onto a large sheet of wax paper. Use a spatula to smooth out evenly to approximately 1/4″ thick.
3. Sprinkle remaining 1/4 cup crushed cookies and green sprinkles on top. Chill for about 10 minutes or until completely set.
4. Once set, cut or break into pieces.
Option: You can also spread the bark mixture out onto a large sheet of wax paper on a flat surface (eliminating the use for the pan).
1.Melt Chocolate CANDIQUIK® in Melt & Make™ Microwaveable Tray according to package directions.
2. Spoon melted CANDIQUIK® into each shot glass mold, filling to the top.
3. Allow to set completely. Once set, pop chocolate shot glasses out of mold.
Tip: to easily release chocolate from the silicon mold, pull the silicon away from the chocolate, releasing the seal and push from the bottom up, inverting the mold.
Prepare dipped pretzels first by melting 1 package of Chocolate CANDIQUIK® Coating and Vanilla CANDIQUIK® Coating in Melt & Make™ Microwaveable Trays according to the package directions.
Dip 2 cups of the mini pretzels in the vanilla coating and the remaining 2 cups in the chocolate coating; place on wax paper to dry.
Place the cereal, peanuts, and raisins in a large bowl.
Melt the remaining package of Chocolate CANDIQUIK® Coating and pour directly on top of the cereal mixture. Quickly fold chocolate in with the mixture and pour onto a large sheet of wax paper, spreading into a thin layer. Let dry.
Once set, break the cereal mixture into small pieces and toss in a large bowl with coated pretzels, marshmallows and M&M’s®.
1. Prepare and bake cake mix as directed on box; cool completely.
2. Crumble cake into a large bowl. Add frosting and mix thoroughly.
3. Roll mixture into 1″ sized balls. Chill for approximately 1-2 hours in the refrigerator.
4. Melt Chocolate CANDIQUIK® in Melt and Make Microwaveable Tray™ according to the directions on package.
5. Insert a lollipop stick into each cake ball. Dip cake pops in melted CANDIQUIK®, allow excess coating to drip off; place in Styrofoam block until set.
6. Using Chocolate CANDIQUIK®, pipe on the handle and rim of the pot using a piping bag (or a plastic ziploc bag with one tiny corner snipped off).
7. Carefully remove the lollipop stick from your cake ball by twisting and gently pulling. Pipe a dot of chocolate CANDIQUIK® onto wax paper and place cake ball on top, this will form the base of the pot.
8. Cut your (Air Heads®) rainbow candy into 4″ strips. Pipe a line of chocolate on top of your cake ball and hold one end of the rainbow in the coating until set. Then poke a small hole and insert a toothpick directly behind the rainbow (the rainbow candy is very limp and will need assistance to stand up).
9. Fill in the top of the cake ball by piping with Chocolate CANDIQUIK®; quickly cover with gold sprinkles.
10. Grab a small handful of mini marshmallows and press together with your hands.
11. Use a dab of CANDIQUIK® to secure the opposite end of the rainbow candy in the middle of the marshmallow “clouds”.
1. Melt Vanilla CANDIQUIK® Coating in Melt and Make Microwaveable Tray™ according to directions on package.
2. Using fingers or tongs, dip a pretzel in the melted candy coating, making sure each side is completely coated; let excess drip off. Place the pretzel onto wax paper.
3. Repeat step 2 with the second and third pretzels, pushing each next to each other on the wax paper to form the shape of a shamrock. For the stem; break off a small piece of a pretzel, dip in coating and press against the bottom of the shamrock. (If desired, you may then dip the entire shamrock in the CANDIQUIK® for a thicker coating.)
4. Pour the remaining Vanilla CANDIQUIK® into a piping bag (or a plastic bag with a small corner cut off) and outline the shamrock pretzel with the candy coating. Over a bowl, quickly sprinkle with green sugar decors.
1. Prepare and bake cake mix as directed on box; cool completely.
2. Crumble cake into a large bowl. Add frosting and mix thoroughly.
3. Roll mixture into 1″ sized balls. Chill for approximately 1-2 hours in the refrigerator.
4. Melt CANDIQUIK® Coating in Melt and Make Microwaveable Tray™ according to directions on package.
5. Insert a lollipop stick into each cake ball. Dip cake pops in CANDIQUIK®; allow excess coating to drip off. Place in Styrofoam block to set.
6. Using Chocolate CANDIQUIK®, pipe on the handle and rim of the pot using a piping bag (or a plastic Ziploc bag with one tiny corner snipped off).
7. Carefully remove the lollipop stick from your cake ball by twisting and gently pulling. Pipe a dot of chocolate CANDIQUIK® onto wax paper and place cake ball on top, this will form the base of the pot.
8. Cut your (Air Heads®)rainbow candy into 2” strips. Pipe 2 perpendicular lines of chocolate coating on top of your cake ball and hold the ends of the rainbow in the coating until set.
9. Fill in the top of the cake ball by piping with Chocolate CANDIQUIK®; quickly cover with gold sprinkles.
2. Place two small candy canes (per sucker) together to form a heart shape; place on a greased cookie sheet. Place a lollipop stick in the middle of the candy canes.
3. Heat for approximately 3-5 minutes in the oven; they will become soft and start to bubble. Caution: very hot!
4. Remove from the oven and (with a pair of tongs or utensils) quickly pinch the top and bottom ends of the candy canes to the lollipop stick. Set aside until cooled; this should only take a few minutes.
5. Melt CANDIQUIK® in Melt & Make™ Microwaveable Tray according to directions on package. Optional: Add a few drops of food coloring to the coating (oil or powder based only) if desired.
6. Place lollipops onto wax paper and spoon a small amount of CANDIQUIK® into the center of each sucker, smoothing out to fill into the edges. Sprinkle and decorate before coating is set.
2. In a large bowl, cream together butter and sugar until smooth. Beat in egg and vanilla. Stir in the flour, baking powder, and salt.
3. Roll out dough on a well-floured surface approx. ¼ inch thick. Cut into shapes with cookie cutter. For the middle cookies: cut into shapes and cut a hole in the center of the dough.
4. Bake 6 to 8 minutes. Cool completely.
5. Melt Vanilla CANDIQUIK® in Melt & Make™ Microwaveable Tray according to package directions. Dip the front side of each top & bottom cookie in CANDIQUIK®. Place on wax paper to set. (Leave middle cookies uncoated.)
6. Place remaining CANDIQUIK® coating in a piping bag or plastic bag with one corner cut off.
7. Pipe CANDIQUIK® around the edge of the bottom cookie; press middle cookie on top: fill with assorted candy or desired spread; pipe coating around the edge of the middle cookie and press on the top cookie.
8. To create envelope decoration: pipe on CANDIQUIK® as shown in the photo. Decorate with edible markers.
1. Prepare and bake cake mix as directed on box; cool completely.
2. Crumble cake into a large bowl. Add frosting and mix thoroughly. Chill for approximately 1-2 hours in the refrigerator.
3. Make sure the cake mixture is packed tight. On wax paper, roll out to approximately ½ inch thick. You may need to smooth out any cracks with your fingers.
4. Cut out heart shapes with a small (1-1 ½”) cookie cutter.
5. Melt CANDIQUIK® in Melt & Make™ Microwaveable Tray according to directions on package.
6. With a spoon, dip cake bites in melted CANDIQUIK®; set on wax paper.
7. Pipe a heart shape around the edges with vanilla candy coating and sprinkle immediately.
1. Stack three marshmallows together by pressing on a lollipop stick.
2. Melt Vanilla CANDIQUIK® in Melt & Make™ Microwaveable Tray, according to package directions.
3. Holding the end of the lollipop stick, dip the marshmallows in the melted candy coating; allow the excess coating to drip off and stand up on wax paper.
4. Before coating has completely set, attach pretzel sticks to the side of the marshmallows, forming the arms. Press one candy-coated sunflower seed on as the nose.
5. Once completely set, draw on eyes and mouth using an edible marker.
6. Carefully remove the lollipop stick by twisting and pull up or cut off the end with scissors.
2. Arrange the pretzel snaps on a parchment-lined baking sheet; divide the toasted pecans on top of each pretzel snap or into 16 small piles directly on the parchment paper.
3. Flatten each caramel cube to approximately 1” square and place on top of the pecans.
4. Heat in the oven for 5 to 7 minutes, or until the caramel softens and begins to melt.
5. Remove from the oven; let cool.
6. Melt CANDIQUIK® in Melt & Make™ Microwaveable Tray according to the package directions.
*For the pretzel version: drizzle each candy with chocolate coating.
*Sans pretzel: spoon a small amount of chocolate coating directly onto the parchment paper. Place the pecan/caramel candy on top of the chocolate. Drizzle with additional chocolate coating.
7. Top each candy with a few flakes of coarse sea salt.
FOR COCOA COOKIES:
1. Combine all ingredients together. Add flour slowly, stirring between each addition. Stir until dough is thick and not sticky.
2. Once well mixed, roll very thin. Cut into desired shapes with cookie cutter.
3. Bake at 325 degrees F for 4-7 minutes, or until cookies are firm and the edges are slightly browned. Cool.
FOR BUTTERCREAM FILLING:
1. Mix all ingredients together until it becomes thick. With a rolling pin, roll mixture 1/4” thick. Cut into desired shape.
2. Place atop cooled cocoa cookies.
3. Melt CANDIQUIK® Coating in Melt & Make™ Microwaveable Tray according to the package directions. Dip cookies into melted CANDIQUIK® and spoon chocolate over the cookie until fully coated. Place on wax paper to set.
2. Measure flour; set aside. Combine all remaining ingredients together in a large bowl and stir to combine.
3. Gradually add flour and stir well, until dough is roll-able and not sticky. Once well mixed, roll out very thin with a rolling pin.
4. Cut into desired shapes with cookie cutters.
5. Bake for 4-7 minutes, or until cookies have firmed and browned slightly around edges. Remove from oven and cool.
FOR BUTTERCREAM FILLING:
6. In a medium bowl; mix all ingredients together until it becomes thick and easy to roll with a rolling pin.
7. Roll until about 1/4″ thick. Cut into desired shape. Place atop cooled cookies.
8. Melt Chocolate CANDIQUIK® in Melt & Make™ Microwaveable Tray according to the package directions.
9. To dip cookies, lower into melted CANDIQUIK® on a fork and spoon CANDIQUIK® over the cookie until fully covered. Place on wax or parchment paper to dry.
1. Layer ingredients by first pouring the peanuts in the bottom of slow cooker.
2. Layer the chocolate chips over the peanuts.
3. Top with the Vanilla CANDIQUIK® chunks.
4. Place the slow cooker temperature on low and cook for 1.5 hours. Do not stir.
5. After 1.5 hours, stir the mixture with a large spoon or spatula.
6. Drop the candy into a lined cupcake pan, mini cupcake pan, or by the spoonful onto wax or parchment paper.
7. Allow the candy to set completely before serving. Speed up setting by placing in the refrigerator.
NOTES:
Because slow cooker heats can vary, check mixture after 1 hour to make sure the candy coating is not burning. You will notice any scorching/burning by the candy coating turning a light brown color. To prevent scorching, try to prevent candy coating from resting on the sides of the slow cooker.
You may start to notice a smell after about 45 minutes as the peanuts become more fragrant.
1. Preheat the oven to 350 degrees F. Spray a 13×9-inch baking pan with nonstick spray.
2. Prepare the blondie layer: In a medium bowl, melt butter in the microwave; stir in brown sugar. Use an electric mixer to beat in the eggs and vanilla.
3. In a separate bowl, whisk together the flour, baking powder, salt and cinnamon; gradually add the dry mixture to the butter mixture.
4. Fold in the cranberries and chopped CANDIQUIK® (the batter will be thick).
5. Spread the blondie batter into the prepared pan. Bake for 18-21 minutes until edges are lightly browned and a toothpick inserted near the center comes out clean (do not over bake). Cool completely on a wire rack.
6. Prepare the frosting: In a large bowl, use an electric mixer to beat the softened cream cheese and powdered sugar until well-blended. Gradually add half (3 oz) of the melted CandiQuik and orange zest; beat until blended. Frost blondies. Sprinkle with cranberries. Drizzle with remaining (3 oz.) melted Vanilla CANDIQUIK®.
7. Cut into square or triangle-shaped bars. Store in the refrigerator until ready to serve.
1. Prepare and bake cake mixes as directed on box; cool completely.
2. Crumble both cakes into a large bowl. Add frosting and mix thoroughly.
3. Roll mixture into 1″ sized balls. Chill for approximately 1-2 hours in the refrigerator.
4. Melt CANDIQUIK® Coating in Melt & Make™ Microwaveable Tray according to directions on package.
5. Insert a lollipop stick into each cake ball. Dip cake pops in CANDIQUIK®; allow excess coating to drip off. Place in Styrofoam block to set.
6. Decorate cake pops as desired with candy coating and/or icing and sprinkles.
7. Once completely dry, carefully remove the cake ball from the lollipop stick. Insert a toothpick in the Styrofoam cone and press the cake ball on the end of the toothpick. Repeat until entire cone is filled with cake balls. (By dipping the cake balls on a lollipop stick, this ensures the cake ball is perfectly round and will sit flush against the cone.)
*Note: Depending on the size of your Styrofoam cone, the number of cake balls required will vary. 2 cakes worth fills approximately one 9-inch cone.
*For a step-by-step tutorial of this tree, please visit the Miss Candiquik blog.
TIPS:
• If cake balls become too soft or do not hold their shape while being dipped, return to the refrigerator for an additional 20-30 minutes.
• Position Styrofoam cone on a cake tier or plate prior to adding cake balls.
• When attaching cake balls to the cone, work from the base of the tree and build up towards the top.
1. Line a baking sheet with wax paper and spray with nonstick cooking spray.
2. Wash grapes and pat completely dry. Spear each grape with a toothpick.
3. Melt caramels in a microwave safe bowl in 30 second increments until smooth. Holding the end of the toothpick, dip each grape in the melted caramel and place on prepared wax paper.
4. Place grapes in the refrigerator for 15 minutes or until the caramel is completely set.
5. Melt Vanilla CANDIQUIK® in Melt & Make™ Microwaveable Tray according to package directions.
6. Holding the end of the toothpick dip each grape in the CANDIQUIK®; allow excess coating to drip off and return to wax paper.
7. Dip the bottom of the grape popper in graham cracker crumbs and sprinkle immediately with cinnamon.
1. Melt Chocolate CANDIQUIK® in Melt & Make™ Microwaveable Tray according to directions on package.
2. Dip the tops of the crackers in Chocolate CANDIQUIK® and place on wax paper. Before dry, attach 4 pieces of candy corn near the top edge of each cracker. Let set.
3. Dip ¾ of each pretzel rod in the Chocolate CANDIQUIK®, allow excess coating to drip off, then press and hold the pretzel rod against the cracker until secure.
4. Before pretzel is completely dry, press one candy corn on the pretzel rod as the nose, holding in place until secure.
5. Sprinkle nonpareils near the bottom of the pretzel if desired.
6. Press two white confetti sprinkles on the pretzel rod as the eyes and press a heart sprinkle (upside-down) below the candy corn nose (be careful not to touch the chocolate coating).
7. Finally, add two black dots on the eyes with the edible marker.
2. Line Ritz crackers on a cookie sheet and top each one with a Rolo chocolate.
3. Place in the oven until the chocolate Rolos appear to be melting.
4. Press another Ritz cracker on top and let cool.
5. Melt Chocolate CANDIQUIK® in Melt & Make™ Microwaveable Tray according to package directions. Coat each cracker candy in chocolate and place on wax paper to set; sprinkle.
1. Prepare and bake cake mix as directed on box; cool completely.
2. Crumble cake into a large bowl. Add frosting and mix thoroughly.
3. Roll mixture into 1″ sized balls. Chill for approximately 1-2 hours in the refrigerator.
4. While cake balls are cooling, prepare the “feathers” of the turkeys by gathering the candy corn and round crackers.
5. Melt Chocolate CANDIQUIK® in Melt & Make™ Microwaveable Tray according to the directions on package. Dip crackers in CANDIQUIK® and place on wax paper. Before dry, attach 4 pieces of candy corn on the top edge of each cracker. Let set.
6. Melt remaining CANDIQUIK® in Melt & Make™ Microwaveable Tray according to directions on package.
7. Insert a lollipop stick into each cake ball. Dip cake pops in CANDIQUIK®, allow excess coating to drip off; press a candy corn on the center of the cake pop as the nose, a heart sprinkle below the nose, and 2 eye sprinkles.
8. Before cake pop is completely dry, press and hold the chocolate coated cracker against the back of the turkey until set. Place in Styrofoam block to dry.
Optional: use a dab of coating to attach the pretzel pieces to the bottom of the cake pop as legs.
TIP: If cake balls become too soft or are not holding their shape while being dipped, place back in the refrigerator for 20-30 minutes.
1. Melt CANDIQUIK® in Melt & Make™ Microwaveable Tray according to package directions.
2. Carefully insert a lollipop stick into the center of each OREO® cookie.
3. Dip cookie pops into the CANDIQUIK®; let the excess coating drip off.
4. Press candied eyes onto the pops. Press four pieces of candy corn above the eyes to form the feathers; stand one candy corn upright for the beak. Place on wax or parchment paper to set.
1. Melt Vanilla CANDIQUIK® in Melt & Make™ Microwaveable Tray according to package directions.
2. Dip half of each pretzel rod in the melted CANDIQUIK®; allow excess coating to drip off and place on wax paper.
3. Before coating has set, place two mini chocolate chips on as the eyes. For the mouth, cut off the tip of a mini chocolate chip and place on the pretzel with the bottom side facing up.
1. Melt CANDIQUIK® in Melt & Make™ Microwaveable Tray according to directions on package.
2. Place a large piece of wax or parchment paper on a flat surface.
3. Dip strawberries in melted CANDIQUIK® Coating, remove and allow the excess coating to pour off onto the wax paper to form the “tail” of the ghost; slide the strawberry back and let set.
4. Before coating has set, place two mini chocolate chips on as the eyes. For the mouth, cut off the tip of a mini chocolate chip and place on the strawberry with the bottom side facing up.
1. Drain and thoroughly rinse black beans. Place beans, coconut oil, vanilla and honey in a food processor and blend until smooth. Add chocolate powder and blend again until combined. (Note: mixture may become very thick and may need to be transferred into a bowl to mix)
2. Using a spatula, scrape mixture into a medium sized bowl and stir in cocoa powder. (note: taste and add more or less to liking)
3. Place mixture in the fridge (or freezer) until somewhat firm, about 20 minutes.
4. Roll mixture into 1″ balls and place on a baking sheet lined with wax or parchment paper.
5. Place back in the freezer to chill for approximately 30 minutes.
6. Melt Chocolate CANDIQUIK® in Melt & Make™ Microwaveable Tray according to package directions. Transfer into a deep cup or mug for easy dipping.
7. Re-shape balls (if needed) and using a toothpick, dip each ball into chocolate coating and place on wax paper to set; sprinkle if desired.
Tips:
-When dipping truffles, remove only a few at a time, keeping the remaining truffles chilled before being dipped.
-When rolling truffles, wet hands slightly to prevent sticking.
1. Prepare and bake cake mix as directed on box; cool completely.
2. Crumble cake into a large bowl. Add frosting and mix thoroughly.
3. Roll mixture into 1″ sized balls. Chill for approximately 1-2 hours in the refrigerator.
4. Melt CANDIQUIK® Coating in Melt & Make™ Microwaveable Tray according to directions on package.
5. Dip cake balls in CANDIQUIK® and place on wax paper. Before dry, press 1 Gummy Saver candy in the center of each cake ball. Place a mini M&M in the middle of the gummy saver.
6. Once completely set, use cake writing icing to pipe red lines on the sides of the cake ball.
TIP: If cake bites become too soft or are not holding their shape while being dipped, place back in the refrigerator for 20-30 minutes.
1. Melt CANDIQUIK® Coating in Melt & Make™ Microwaveable Tray according to package directions.
2. Pour Vanilla CANDIQUIK® into a piping bag (or a plastic Ziploc® bag with a small corner snipped off).
3. Arrange pretzel rods on a large piece of wax or parchment paper. Drizzle the coating over the top 3/4 of each pretzel rod, leaving a small empty space for the eyes.
4. Using a toothpick, draw on eyes with melted Chocolate CANDIQUIK®.
1. Prepare and bake cake mix as directed on box; cool completely.
2. Crumble cake into a large bowl. Add frosting and mix thoroughly.
3. Roll mixture into 1″ sized balls. Chill for approximately 1-2 hours in the refrigerator.
4. Melt 8 oz. Chocolate CANDIQUIK® according to directions on package. Dip rim of waffle ice cream bowls in melted CANDIQUIK® Coating; set on wax paper to dry. Set Chocolate CANDIQUIK® Coating aside.
5. Melt Vanilla CANDIQUIK® in Melt & Make™ Microwaveable Tray according to directions on package.
6. Dip cake balls in melted Vanilla CANDIQUIK® Coating, and place inside waffle ice cream bowl. Place 5 coated cake balls in each ice cream bowl. Sprinkle if desired.
7. Once dry, reheat Chocolate CANDIQUIK® and spoon a small amount on top of each pile of cake bites, allowing the chocolate to drip. Top with a red M&M® before coating has set.
1. Melt both packages of CANDIQUIK® in Melt & Make™ Microwaveable Tray according to the package directions.
2. Hold the end of the waffle cone and dip the top 2 – 3″ in the coatings.
3. Allow the excess coating to drip back into the tray; waiting about 30 seconds to add sprinkles, chopped nuts, etc. Set on wax paper to dry completely.
TIP: to easily coat in chocolate; roll and rotate the top of the cone directly in the tray of CANDIQUIK®.
1. Prepare and bake cake mix as directed on box; cool completely.
2. Crumble cake into a large bowl. Add frosting and mix thoroughly.
3. Roll mixture into 1″ sized balls. Chill for approximately 1-2 hours in the refrigerator.
4. Carefully cut off the top of the waffle cones so the cones measure approximately 2 ½ inches tall.
5. Melt Vanilla CANDIQUIK® Coating in Melt & Make™ Microwaveable Tray according to directions on package.
6. Press a cake ball on top of the mini waffle cone. Dip the top of the cake ball into the CANDIQUIK by holding the end of the cone. Slowly allow most of the excess vanilla coating to drip off, letting a little melt down over the cone (gives it the melted look
when dry)! Sprinkle if desired.
7. Stick cones into a Styrofoam block or ice cream cone holder to dry. Once dry, melt Chocolate CANDIQUIK and spoon a small amount on top of each cone allowing it to drip over the sides. Top with a red M&M® candy before chocolate has set.
1. Insert a lollipop stick into the center of each Oreo® cookie.
2. Melt CANDIQUIK® in Melt & Make™ Microwaveable Tray according to directions on package.
3. Dip cookie pops in melted CANDIQUIK®; allow excess coating to drip off; place on wax paper to dry.
4. Sprinkle the top 1/3 of the cookie with red sugar sprinkles and the bottom 1/3 with blue sugar sprinkles, leaving the middle of the cookie open. Attach star sprinkles to the middle of the cookie.
1. Prepare cake as directed on box (substituting water with equal amount, 1-1/4 cups, of porter or stout beer).
2. Crumble cooled cake into a large bowl.
3. Prepare frosting: mix softened butter until fluffy. Slowly add powdered sugar, stout, vanilla, and salt; beat on medium-high for 3 minutes or until light and fluffy.
4. Add ½ cup of frosting to crumbled cake and mix thoroughly.
5. Roll mixture into 1″ balls and place in the refrigerator for approximately 1 hour.
6. Melt Chocolate CANDIQUIK® in Melt & Make™ Microwaveable Tray according to package directions. Dip cake balls in chocolate coating and place on wax paper to set.
TIP: For more flavorful cake truffles, allow the cake balls to sit in the refrigerator for 24 hours prior to coating.
2. Melt Vanilla CANDIQUIK® Coating in Melt & Make™ Microwaveable Tray according to directions on package.
3. Dip each strawberry in melted Vanilla CANDIQUIK® Coating; covering about 3/4 of the strawberry; set on wax paper. Set half of the dipped strawberries aside for grooms.
*To create brides, decorate white strawberries with decorative sprinkles before coating sets.
4. Melt Chocolate CANDIQUIK® Coating in Melt & Make™ Microwaveable Tray according to directions on package.
5. Dip the “groom” strawberries in melted Chocolate CANDIQUIK® in overlapping diagonals to create the chocolate “V”. Return to wax paper to set.
6. Once set, use a toothpick to dot buttons and draw bowtie with Chocolate CANDIQUIK®.
1. Melt both packages of CANDIQUIK® Coating in Melt & Make™ Microwaveable Tray according to directions on package.
2. Add solid vegetable shortening; stir until smooth.
3. Pour directly into pre-heated fountain.
*Please note: depending on the size of your fountain, more CANDIQUIK® and vegetable shortening may be needed. Add 2 tablespoons of solid vegetable shortening per 1 package of CANDIQUIK®.
Prepare cake mix as directed on box, adding an additional egg and dry pudding mixture before baking.
Bake as directed, reducing bake time by approximately 2 minutes.
While cake is baking, prepare truffle mixture; mix softened cream cheese, Golden OREO® crumbs and lemon zest until well blended; set aside.
Once the cake is completely cooled, use a knife to slice the cake lengthwise to remove the top of the cake; creating a level surface.
Roll OREO truffle mixture out onto a piece of wax paper until it measures approximately 9X13″.
Transfer OREO truffle mixture on top of the cake. Trim off any excess truffle mixture that may hang over the edges of the cake.
Cut cake into squares (optional). Melt Vanilla CANDIQUIK® in Melt & Make™ Microwaveable Tray as directed on package. Spread a thin layer of CANDIQUIK® on top of the cake.
1. Heat corn syrup in saucepan over medium heat until simmering, stirring frequently.
2. In a medium bowl, mix heated corn syrup with shredded coconut, vanilla and salt. Mixture will be thick and sticky.
3. With hands, form coconut mixture by the tablespoon into an oval about 2 inches long and 3/4 inch thick, packing firmly. Press walnut on top. Set on a wax paper lined baking sheet and place in freezer for 20-30 minutes.
4. Melt CANDIQUIK® Coating in Melt and Make Microwaveable Tray™ according to the package directions.
5. Place coconut bar on a fork and dip into the CANDIQUIK® Coating, use a spoon to pour coating over the top of the candy, covering it completely. Place candies on wax paper lined baking sheet to set.
Store in an airtight container at room temperature.
1. Melt Vanilla CANDIQUIK® Coating in Melt & Make™ Microwaveable Tray according to directions on package.
2. In a large bowl, beat cream cheese, melted CANDIQUIK® and coconut pudding, mix until well blended.
3. Fold in 1 container of whipped topping, half of the container at a time and mix until well combined.
4. Carefully spoon mixture into graham cracker crust. Top with whipped cream and toasted coconut.
For toasted coconut:
Spread shredded coconut evenly on a baking sheet.
Toast 7 to 12 minutes in a 300°F oven, stir frequently until coconut is lightly browned.
2. Mix coconut, sugar, flour and salt in a large bowl.
3. Lightly beat egg whites and almond extract together by hand. Add to coconut mixture and mix well.
4. Drop by tablespoonful onto a well-greased and floured baking sheet. Press a finger in the center of each macaroon to form an indent for the nest.
5. Bake for 20 minutes or until edges are golden brown. Place on a wire baking rack to cool completely.
6. Melt CANDIQUIK® in Melt & Make™ Microwaveable Tray according to package directions and spoon a small amount into the center of each macaroon. Place 3 chocolate eggs in the chocolate center. Let set.
1. Melt Chocolate CANDIQUIK® in Melt & Make™ Microwaveable Tray according to the directions on package.
2. Spoon a small amount of CANDIQUIK® into each of the silicon molds; push the coating up the sides of the mold with the back of your spoon. Bring the coating almost to the top of the cup, but not over the edge. Repeat with all remaining mold cavities; let set.
3. Once completely set, carefully peel the silicon baking mold away from the CANDIQUIK® coating and ‘pop’ out the chocolate eggs.
4. Using the back of your spoon, spread the chocolate around the edges of one egg half, fill with candy and place another egg half on top, gently press down and set aside to dry.
5. Using a toothpick dipped in CANDIQUIK®, apply coating where desired and sprinkle to decorate.
1. Melt CANDIQUIK® Coating in Melt & Make™ Microwaveable Tray according to directions on package.
2. Spoon a small amount of CANDIQUIK® Coating into the silicon cup; push the coating up the sides of the baking cup with the back of a spoon. Bring the coating almost to the top of the cup, but not over the edge. Repeat with all remaining cups; let dry. (If using foil baking cups, place in muffin pans to add stability.)
3. Once coating is set, carefully peel baking cups away from CANDIQUIK® Coating.
4. Prepare pistachio pudding mix according to directions on package.
5. Fill each cup with pudding. Top with whipped cream before serving. Keep refrigerated.
2. Spray 9″ spring form pan with non-stick cooking spray. Line bottom with a circle of parchment paper. Spray paper with cooking spray.
3. Break CANDIQUIK® into small pieces and place CANDIQUIK® pieces and 1 cup of butter in Melt & Make™ Microwaveable Tray, and microwave on high for 45 seconds to 1 minute. Stir well. Heat for an additional 15 seconds if needed and stir until well blended (do NOT overheat coating).
4. Pour CANDIQUIK® mixture into large bowl. Add sugar and mix well.
5. Add eggs, one at a time, mixing well after each addition.
6. Sift cocoa on top of mixture and stir well.
7. Pour batter into prepared pan. Bake for 35-40 minutes, or until cake has risen and top has formed a thin crust.
8. Cool for 10 minutes. Invert pan onto a plate and remove sides of spring form pan. Remove parchment paper.
FOR GLAZE:
9. Combine 2 squares (4 oz.) of CANDIQUIK® and 3 tablespoons of butter in a small saucepan over medium heat. Stir until smooth.
10. Remove from heat. Stir in vanilla, honey, and milk. Set aside to cool slightly.
11. Pour glaze over cake, smoothing glaze over the top and sides of the cake.
*Chill cake in refrigerator, uncovered, for 30-60 minutes before serving
*TIP: Garnish with fresh berries, whipped cream, or powdered sugar.
1. Prepare and bake cake mix as directed on box; cool completely.
2. Crumble cake into a large bowl. Add frosting and mix thoroughly.
3. Roll mixture into 1″ sized balls; pinching the top to form a slightly pointed shape. Chill for approximately 1-2 hours in the refrigerator.
4. Melt CANDIQUIK® Coating in Melt & Make™ Microwaveable Tray according to directions on package. Add a few drops of red food coloring in the melted CANDIQUIK® until desired color is established.
5. Insert a lollipop stick into each cake ball. Dip cake pops in CANDIQUIK®; allow excess coating to drip off. Place in Styrofoam block to set.
6. Once the cake pops are almost set, you can drizzle with additional CANDIQUIK® to form the flower petals.
7. For leaves: cut leaf shapes out of green paper mache and attach to lollipop with clear tape.
TIP: If cake balls become too soft or are not holding their shape while being dipped, place back in the refrigerator for 20-30 minutes.
Spoon a small amount of graham cracker crumbs into the bottom of each shot glass; set aside.
Melt Vanilla CANDIQUIK® in Melt & Make™ Microwaveable Tray according to directions on package.
In a large bowl, beat softened cream cheese, Vanilla CANDIQUIK®, and dry cheesecake pudding; mix until well blended. Add whipped topping and blend until combined.
Fold in chopped turtle candies. Spoon cheescake mixture into a piping bag (or a plastic Ziploc bag with one corner cut off).
Pipe cheecake into glasses, layering with remaining graham cracker crumbs and chocolate and caramel syrups.
Top with whipped cream immediately prior to serving. Drizzle with additional caramel and chocolate syrup. Keep refrigerated.
1. Melt CANDIQUIK® in Melt & Make™ Microwaveable Tray according to directions on package. To color Vanilla CANDIQUIK®, stir in a few drops of food coloring (oil or powder based only) until desired color is established.
2. Add 1/4 teaspoon of peppermint extract to melted CANDIQUIK® if desired; mix well.
3. Lightly spray cookie cutters with non-stick cooking spray; place on wax paper
4. Spoon a small amount of CANDIQUIK® into each cookie cutter and
decorate with sprinkles before coating sets.
5. Once CANDIQUIK® is completely set, push candies out of the cookie cutters (for faster setting, place in refrigerator).
1. Finely crush OREO® cookies (including the middle icing) in a food processor.
2. In a large mixing bowl combine crushed cookies and cream cheese until well blended.
3. Roll mixture into 1-inch sized balls and place on a wax paper lined baking sheet. Chill in refrigerator for 15 minutes (speed up by placing in the freezer).
4. Melt CANDIQUIK® Coating in Melt & Make™ Microwaveable Tray according to package directions.
5. Dip OREO® balls in CANDIQUIK® and place on wax paper to set. Store in refrigerator.
1. Line a 8×8″ pan with aluminum foil and lightly spray with nonstick spray.
2. Pour one cup of salted peanuts into the pan and spread out evenly to cover the entire bottom of the pan. Sprinkle miniature marshmallows on top of peanuts.
3. Melt Vanilla CANDIQUIK® in Melt & Make™ Microwaveable Tray, according to package directions. Stir in peanut butter.
4. Pour half of the CANDIQUIK® mixture over the top of the peanuts/marshmallows and use a spoon to spread the coating evenly over the top.
5. In a medium saucepan, melt caramel bits with 1 tablespoon of water, over medium-low heat, stirring constantly until smooth. Drizzle caramel over the top of the CANDIQUIK®.
6. Pour the remaining CANDIQUIK® over the caramel and use a spoon to spread the coating evenly over the top again.
7. Top with remaining peanuts. Let set for 30-45 minutes, or until completely firm. Cut into squares to serve.
*To speed up the setting, place in the refrigerator until firm.
Prepare an 8×8″ pan by lining with aluminum foil and coat with nonstick spray.
Break Vanilla CANDIQUIK into small squares. Add CANDIQUIK squares and sweetened condensed milk to a medium saucepan and melt over low heat; stirring frequently until smooth.
Pour mixture into prepared pan. Slightly soften Biscoff spread by heating in the microwave for 5-10 seconds. Spoon Biscoff on top of fudge and use a knife to swirl the Biscoff through the fudge.
Let set for 30-45 minutes. Cut into 1″ squares to serve (store in the refrigerator for easy serving).
Tip: DO NOT overheat, if a few chunks of coating remain while melting, remove from heat and stir until melted; the residual heat will melt any remaining chunks.
1. Prepare and bake cake mix as directed on box; cool completely.
2. Crumble cake into a large bowl. Add frosting and mix thoroughly.
3. Roll mixture into 1″ sized balls. Chill for approximately 1-2 hours in the refrigerator.
4. Melt CANDIQUIK® Coating in Melt & Make™ Microwaveable Tray according to directions on package.
5. Insert a lollipop stick into each cake ball. Dip cake pops in Vanilla CANDIQUIK®; allow excess coating to drip off. Dip cake pops in crushed peppermints and place on wax paper to set.
6. Once set, use a dab of CANDIQUIK® to attach cake pops to peppermint disks (see directions below).
For peppermint disks:
1. Preheat oven to 350 degrees F. Line a baking sheet with parchment paper.
2. Place candies on prepared baking sheet. Bake for 5-7 minutes or until soft. Remove from oven and use the back of a spoon to press candies flat. Cool.
TIP: If cake balls become too soft or are not holding their shape while being dipped, place back in the refrigerator for 20-30 minutes.
1. Melt Chocolate CANDIQUIK® Coating in Melt & Make™ Microwaveable Tray according to package directions.
2. Dip bottom of chocolate kiss in melted CANDIQUIK® and press onto the top of marshmallow; place on wax or parchment paper until set. Repeat to make 24 dreidels.
3. Press 1 thin pretzel stick into the end of each marshmallow. Dip dreidels in Chocolate CANDIQUIK® and return to wax paper; let set.
4. Melt Vanilla CANDIQUIK® according to package directions and pour into a plastic bag; cut a tiny slit in one corner and pipe Hebrew letters onto 3 sides of each dreidel.
1. Melt CANDIQUIK® Coating in Melt & Make™ Microwaveable Tray according to directions on package.
2. Using a toothpick or skewer, dip 1 large marshmallow into melted CANDIQUIK®. Sprinkle with red sugar decors and place on top of pretzel twist. Add miniature chocolate chips for buttons.
3. Insert another marshmallow on skewer and dip into melted CANDIQUIK®. Sprinkle with coconut; add miniature chocolate chips for eyes and a red cinnamon candy for nose.
4. Dab a small amount of CANDIQUIK® on top of the red marshmallow (body) and place the coconut marshmallow (head), on top. Place on wax paper until coating is set.
5. When coating is firm, use a dab of melted CANDIQUIK® to attach red or green mint candies for hats and mini marshmallows for arms.
1. Melt CANDIQUIK® Coating in Melt & Make™ Microwaveable Tray according to directions on package.
2. Add green food coloring to one tray of CANDIQUIK®; mix well.
3. Roll each ice cream cone in the green CANDIQUIK®, thoroughly coating the outside of the cones. Set cones standing upside down on wax paper to dry.
4. Pour Vanilla CANDIQUIK® Coating into a piping bag (or plastic bag with one corner snipped off). Drizzle lightly over green covered sugar cones. Add sprinkles before CANDIQUIK® sets.
6. To apply larger candies, allow CANDIQUIK® to dry faster by placing the cones in the refrigerator. Lay the cones gently on their sides, and apply a small amount of CANDIQUIK® to the back of the assorted candies to adhere them to the tree.
1. Prepare and bake cake mix as directed on box, using 2 (8”) round pans. Cool completely.
2. Cut cakes in half horizontally (yielding 4 cakes total).
3. Melt CANDIQUIK® in Melt and Make Microwaveable Tray™ according to directions on package.
4. In a large bowl beat softened cream cheese, Vanilla CANDIQUIK® and cheesecake pudding, mix until well blended. Fold in whipped topping and mix until well combined.
5. Carefully spread a thick layer of the cheesecake mixture on two of the cakes.
6. Layer the remaining cake halves on top of the cheesecake mixture.
7. Carefully spread remaining half of the cheesecake mixture on top and sides of assembled cake.
8. Refrigerate for 1 hour before serving.
OPTIONAL: Cakes may be layered with more or less cake layers to create 2 cakes or 1 large (tall) cake.
2. In a separate bowl combine sugar, flour, baking powder, salt and nutmeg.
3. Add the egg mixture to the flour mixture and stir until mixed well.
4. Heat oil over medium high heat in a deep frying pan and drop dough by the spoonful into the hot oil; fry until golden brown.
5. Remove from oil, draining carefully and immediately roll doughnut holes in the granulated sugar.
6. Melt CANDIQUIK® Coating in Melt & Make™ Microwaveable Tray according to package directions.
7. Place doughtnut holes on wax paper and carefully spoon a small amount of CANDIQUIK® on top of each doughnut hole and decorate with festive sprinkles.
1. Melt CANDIQUIK® Coating in Melt & Make™ Microwaveable Tray according to directions on package.
2. Dip each cookie in melted CANDIQUIK® Coating; place on wax paper.
3. Arrange candy corn around top of cookie to form turkey’s tail.
4. Use candy corn, small candies and icing to create eyes and beaks.
Optional: If using marshmallow for turkey face, use a sharp knife to cut marshmallow in half; dip in melted CANDIQUIK® Coating. Place marshamllow in center of cookie.
1. Chop entire block of Chocolate CANDIQUIK® into small pieces.
2. In a medium saucepan, heat 1/3 cup milk over medium-low heat until simmering. Once simmering, add chopped CANDIQUIK® and stir constantly until all chunks are melted.
3. Remove from heat, add 1/3 cup chopped pecans and pour CANDIQUIK® mixture back into its original tray. Place in refrigerator until completely solid. Cut into squares and serve.
2. In a large bowl, cream together butter and sugar until smooth. Beat in egg and vanilla. Stir in the flour, baking powder, and salt.
3. Roll out dough on a well-floured surface approx. 1/4 inch thick. Cut into circles (approx. 3″)with cookie cutter.
4. Place cookies 1 inch apart on cookie sheet and bake 6 to 8 minutes. Cool completely.
5. Melt CANDIQUIK® in Melt & Make™ Microwaveable Tray according to package directions. Dip 3/4 of each cookie in Vanilla CANDIQUIK®. Place on wax paper.
6. Unwrap a peanut butter cup, dip in the CANDIQUIK® and place on the bottom (un-coated) edge of the cookie. Press a basketball decor above the peanut butter cup. Let set.
7. Once set, pipe on the backboard and hoop lines with black-colored CANDIQUIK® or cake writing icing.
1. Preheat oven to 350 degrees F. Thoroughly grease one 13 x 9 inch baking pan.
2. In a medium bowl, mix rice cereal, butter and ½ cup coconut; press onto the bottom of the baking pan.
3. In a double-boiler, melt the butterscotch morsels until mostly melted.
4. Melt CANDIQUIK® in Melt & Make™ Microwaveable Tray according to package directions. Carefully spread the CANDIQUIK® and butterscotch chips over the rice cereal mixture.
5. Top with peanuts and almonds, spreading evenly. Spread remaining coconut over entire pan.
6. Pour condensed milk evenly over the whole pan. (Optional: sprinkle with additional coconut).
7. Bake for 20 minutes or until edges become golden brown. Cool completely before cutting into squares.
1. Prepare and bake cake mix as directed on box; cool completely.
2. Crumble cake into a large bowl. Add frosting and mix thoroughly.
3. Roll mixture into 1″ sized balls. Chill for approximately 1-2 hours in the refrigerator.
4. Melt CANDIQUIK® Coating in Melt and Make Microwaveable Tray™ according to directions on package.
5. Insert a lollipop stick into each cake ball. Dip cake pops in Vanilla CANDIQUIK®; allow excess coating to drip off. Place in Styrofoam block to set.
6. Once dry, use the black Gourmet Writer to draw on the eyes and mouth.
TIP: If cake balls become too soft or are not holding their shape while being dipped, place back in the refrigerator for 20-30 minutes.
1. Melt CANDIQUIK® Coating in Melt and Make Microwaveable Tray™ according to directions on package.
2. Select four pretzel sticks and break in half; dip ends of pretzels (or small pieces of red licorice) in melted CANDIQUIK® Coating. Set aside on wax paper to dry.
3. Dip tops of crackers in CANDIQUIK® Coating; place on wax paper until dry. Place two M&M® candies on every other cracker, as eyes.
4. Spread peanut butter on dipped cracker. Arrange dipped pretzel sticks or red licorice pieces on the peanut butter, four on each side, to form the legs.
5. Place remaining crackers on top to form a sandwich.
1. Melt Vanilla CANDIQUIK® in Melt and Make™ Microwaveable Tray according to directions on package.
2. Using utensils, dip cookies in melted CANDIQUIK® Coating, allow excess coating to drip off and place on wax paper.
3. Before coating has set, place two mini chocolate chips on as the eyes. For the mouth, cut off the tip of a mini chocolate chip and place on the cookie with the bottom side facing up.
1. Prepare cake mix according to instructions on package. Bake in Bundt pan. Remove cake from pan; set aside to cool.
2. Melt Chocolate CANDIQUIK® Coating in Melt and Make Microwaveable Tray™ according to directions on package.
3. Dip ice cream cone in melted Chocolate CANDIQUIK® Coating; place on wax paper to set.
4. Place ice cream cone upside-down in hole of bundt cake.
5. Melt Vanilla CANDIQUIK® Coating in Melt and Make Microwaveable Tray™ according to directions on package. Add orange food coloring until desired color is established.
6. Pour orange-colored CANDIQUIK® Coating over the pumpkin cake, smoothing over the edges.
bottom layer:
1. Line your baking pan with aluminum foil and thoroughly coat with non stick spray. Melt CANDIQUIK® in Melt and Make Microwaveable Tray™ according to package directions (reduce heating time accordingly); stir in peanut butter, then pour into the baking dish and spread out evenly. Place in the fridge to let cool and harden completely.
nougat layer:
2. Melt butter in a saucepan over medium heat.
3. Add in sugar and milk, stirring until dissolved and bring to a boil. Let boil for 5 minutes, stirring occasionally.
4. Add in marshmallow fluff, peanut butter and vanilla, stir until smooth.
5. Remove from heat and fold in peanuts, then pour over the bottom chocolate layer. Return to fridge to cool completely.
caramel layer:
6. Combine ingredients in a saucepan over low heat. Let melt, stirring occasionally, until smooth (about 10 minutes). Pour over nougat layer and let cool completely.
top layer:
7. Melt CANDIQUIK® in Melt and Make Microwaveable Tray™ according to package directions; stir in peanut butter, then pour over the top of the caramel layer, quickly smooth evenly over the top. Place in the fridge to let cool and harden completely.
*Refrigerate for at least one hour before serving and cut into squares.
1. FOR THE SHORTBREAD: Preheat your oven to 300°F. Spray a 9″ x 13″ pan lightly with cooking spray (or line with parchment) and set aside.
2. In a medium-sized bowl, beat together the butter, sugar and vanilla. Add the flour. Mix until well combined.
3. Take the dough (it will be thick) and press evenly into the bottom of the pan.
4. Prick the crust all over with a fork. The holes allow the steam to escape and the crust will bake evenly with fewer bubbles.
5. Bake the crust until the edges are golden brown, about 35 to 45 minutes. Remove from the oven and immediately run a knife around the edges to loosen the crust. Set aside to cool completely.
6. FOR THE CARAMEL LAYER: Melt the caramel and cream over low heat in a small saucepan – this takes about 10 minutes. Spread the caramel evenly over the cooled crust and place in the refrigerator for 30 minutes to chill and firm up.
7. FOR THE CHOCOLATE LAYER: After the caramel layer has chilled, cut down the length of the pan, splitting the bars into two long, narrow bars (see notes below). Then cut the bar horizontally, creating 24 bars. Melt chocolate CANDIQUIK® in Melt and Make Microwaveable Tray™ according to package directions; using two utensils, dip the chilled bars into melted chocolate and place on wax paper to set.
Note: For smaller bars, cut shorter/smaller bars; cutting the bars into three long narrow bars, then cut horizontally.
*OR this recipe can also be made into bars, in which you will only need 1 package of chocolate CANDIQUIK® Coating. For simple bars (follow recipe directions beginning after step #6): Melt 1 package of chocolate CANDIQUIK® according to package directions. Spread evenly over the chilled caramel layer. Return to the fridge until the chocolate coating is completely set. Cut into small squares to serve.
1. Melt CANDIQUIK® in Melt and Make Microwaveable Tray™ according to package directions.
2. Stir in 1 teaspoon of peppermint extract and 1 tablespoon of shortening into melted coating until well mixed.*
3. Using a fork, dip the cracker in the coating, using a spoon to completely coat the cracker. Let the excess coating drip off through the fork tines. Place on wax or parchment paper to set. Reheat the coating for a few seconds as needed while dipping (the extract does cause the coating to dry faster).
* Coating may become clumpy and thick after adding the extract, making it very hard to dip without adding the shortening.
1. Melt Vanilla CANDIQUIK® Coating in Melt & Make™ Microwaveable Tray according to directions on package.
2. Pour Vanilla CANDIQUIK in a large bowl and mix with peanut butter, eggs, vanilla and baking soda until well blended.
3. Important: place batter in the fridge to cool (approximately 30-45 minutes prior to baking). Once cooled, preheat oven to 350°F.
4. On parchment paper, form cooled batter into 1″ tightly formed balls; bake for 10-12 minutes or until golden brown. Allow to cool completely on parchment paper.
5. Melt Chocolate CANDIQUIK® Coating in Melt & Make™ Microwaveable Tray according to directions on package. Dip the bottom half of the cookie in Chocolate CANDIQUIK (prevents the cookie from easily crumbling). Return to wax or parchment paper to dry.
1. Melt Vanilla CANDIQUIK® Coating in Melt and Make Microwaveable Tray™ according to directions on package. Add green food coloring (oil or powder based!) to create green coating. Dip 12 marshmallows, one at a time and set on wax paper (heads). Use small assorted candies as a nose and eyes (place on marshmallow before the coating dries).
2. Melt Chocolate CANDIQUIK® Coating in Melt and Make Microwaveable Tray™ according to directions on package. Place 2 green spearmint leaf candies (feet) next to each other to form feet. Dip 12 remaining marshmallows in CANDIQUIK®, one at a time, and set on top of green candies (body/feet).
3. Dip the top 1/4 of green coated marshmallow into Chocolate CANDIQUIK® Coating; set on wax paper to dry.
4. Place a small dab of Chocolate CANDIQUIK® Coating on chocolate coated marshmallow (body), and place the green coated marshmallow (head) on top.
5. Cut large jelly bean in half. Attach with small dab of Chocolate CANDIQUIK® Coating (arms).
6. Using a toothpick, dip lightly in Chocolate CANDIQUIK® to draw mouth, scars, buttons, and “bolts”.
1. Melt CANDIQUIK® Coating in Melt and Make Microwaveable Tray™ according to directions on package.
2. Select 12 pretzels and carefully break in half.
3. Dip pretzel halves and 36 whole pretzel twists in Vanilla CANDIQUIK® Coating; place on wax paper until dry.
4. Using a lollipop stick, carefully press a hole into one side of each peanut butter sandwich cookie. Remove popsicle stick. Dip peanut butter cookies in Chocolate CANDIQUIK® Coating and set on wax paper to dry.
5. Using a toothpick, draw skeletal face on the flat end of marshmallows.
6. Dip lollipop stick in Vanilla CANDIQUIK® Coating. Place 3 dipped (whole) pretzels over popsicle stick; hold until set.
7. Place bottom of popsicle stick in pre-made hole in peanut butter cookie, and place marshmallow head on top.
8. Drape dipped pretzel halves on each side of top of rib cage as arms.
2. Melt CANDIQUIK® Coatings in Melt and Make Microwaveable Tray™ according to directions on package. Add green food coloring to 1 tray of Vanilla CANDIQUIK® to create green coating for Frankensteins. Add orange food coloring to remaining vanilla coating for pumpkins.
3. Dip marshmallows into melted CANDIQUIK® Coating, alternating between colors. Place into a block of Styrofoam to dry.
4. Create faces with assorted candies and decorative icing (attach eyes/nose to CANDIQUIK® before completely dry). For Frankenstein: dip the top 1/4 of the marshmallow in Chocolate CANDIQUIK®.
1. Melt CANDIQUIK® Coating in Melt & Make™ Microwaveable Tray according to directions on package. (To create different colored bonnets, mix oil or powder based colorings and into CANDIQUIK® after melting.)
2. Dip cookies in melted CANDIQUIK®. Place on wax paper to set.
3. Cut frozen marshmallows in half with a sharp knifedip in melted CANDIQUIK® and place in the center of the cookie.
4. When bonnets are dry, decorate as desired.
Suggestions: Pipe ribbon of icing for hatband, add bow design, create dots and flowers on bonnets, decorate with sprinkles.
1. Prepare muffin pan by coating with nonstick spray; set aside.
2. Melt CANDIQUIK® Coating in Melt & Make™ Microwaveable Tray according to directions on package.
3. In a medium bowl mix chow mein noodles and 3/4 of melted CANDIQUIK®, mix well. With a spoon, press mixtures into the bottom and sides of each muffin cup. Refrigerate until firm.
4. Remelt remaining 1/4 of CANDIQUIK® Coating. Drizzle over baskets and sprinkle. Let set until dry.
1. In medium saucepan combine marshmallows and butter; cook over low heat, stirring occasionally until melted. Remove from heat.
2. Stir in chow mein noodles until well coated. Press mixture on bottom and sides of each cavity of 12-cup muffin pan (coat pan with nonstick spray). Refrigerate until firm.
3. Melt CANDIQUIK® in Melt & Make™ Microwaveable Tray according to directions on package.
4. Drizzle melted CANDIQUIK® Coating over cooled nests. Sprinkle before coating is dry. Once dry; fill with jelly beans.
1. Bake sugar cookies according to recipe below; cool completely.
2. Melt Vanilla CANDIQUIK® Coating in Melt & Make™ Microwaveable Tray according to directions on package. Add yellow (oil or powder based) food coloring to melted CANDIQUIK® until a pale yellow color is established.
3. Dip the top sides of cooled cookies in melted CANDIQUIK® Coating.
4. Before coating sets, decorate with sprinkles and/or colored sugars.
5. Once dry, draw beak and eye using cake writing icings.
FOR SUGAR COOKIES:
1. Preheat oven to 375° F. In a small bowl, mix flour, baking soda, and baking powder. Set aside.
2. In a large bowl, mix softened butter and sugar until smooth. Add egg and vanilla. Slowly add dry ingredients while mixing well.
3. Spread flour on surface and use rolling pin to flatten dough; cut with duck cookie cutter.
4. Bake 8 to 10 minutes or until golden brown. Let cool on cookie sheet for 2 minutes before transferring to cooling rack.
1. Melt CANDIQUIK® Coating in Melt and Make Microwaveable Tray™ according to directions on package.
2. One at a time, place a little tap water in each balloon, and inflate to approximately 4” diameter.
3. Dip balloons in CANDIQUIK® and gently rock, forward and backwords, then left and right, ensuring that the balloons are well coated. Allow excess coating to drip off.
4. Set balloons chocolate-side up in mugs and place in refrigerator until very firm.
5. Create bases by pouring 2” circles of CANDIQUIK® onto wax paper. Place in refrigerator to set.
6. To remove chocolate bowls from balloons, gently prick the balloon with a pin and allow it to slowly deflate, carefully pealing the balloon from the chocolate as it deflates.
7. Use a dab of CANDIQUIK® to attach the bowl to the base.
8. Decorate with sprinkles/icing and fill with candy for the holidays.
1. Using a sharp knife, carve out the center (hull) of each strawberry, as deep as you can without carving out the bottom.
2. Melt Chocolate CANDIQUIK® Coating in Melt and Make Microwaveable Tray™ according to the directions on the package. Dip each strawberry in Chocolate CANDIQUIK®, covering about half of the berry. Set on wax paper to dry.
3. For Cheesecake: Melt Vanilla CANDIQUIK® Coating in Melt and Make Microwaveable Tray™ according to the directions on the package.
4. In a medium bowl, blend softened cream cheese, dry cheesecake pudding and Vanilla CANDIQUIK® until smooth. Add the whipped topping, 1/2 container at a time, and mix until well blended.
5. Spoon the cheesecake mixture into a piping bag (or a plastic bag with one corner snipped off) and pipe the cheesecake into each strawberry, slightly overfilling.
6. Refrigerate until ready to serve. For best results, pipe strawberries with cheesecake immediately prior to serving.
FOR CRUST:
1. Preheat oven to 375°F. Mix all ingredients until well blended.
2. Press firmly onto bottom of greased and floured 6″ spring form pan.
3. Bake 8 minutes or until lightly browned; cool completely.
*Alternative: For a No-Bake Crust: Mix ingredients and press into 8″ round pan. Refrigerate at least 30 minutes before filling.
FOR CHEESECAKE:
1. Melt Vanilla CANDIQUIK® Coating in Melt and Make Microwaveable Tray™ according to directions on package.
2. Pour melted CANDIQUIK® in a large bowl over the dry white chocolate pudding and softened cream cheese; blend until smooth.
3. Spread cheesecake mixture in a 6″ spring form pan (well-greased and floured) on top of graham cracker crust; chill in freezer for 20 minutes.
4. Once cheesecake is firm, carefully remove from spring form pan.
5. Melt 8 oz. (half of a package) of Chocolate CANDIQUIK® Coating in Melt and Make Microwaveable Tray™ according to the directions on the package; pour over the top of the cheesecake, smoothing over to the edges and allowing it to drip down the sides.
FOR CRUST:
1. Finely crush ladyfingers in a food processor. (Or place in a plastic bag and crush using a rolling pin). Place in a medium bowl.
2. Add butter and coffee liqueur to crushed ladyfingers; mix until well blended. Press onto bottom and sides of a 9” pie pan; place in refrigerator.
FOR CHEESECAKE:
1. Melt Vanilla CANDIQUIK® Coating in Melt and Make Microwaveable Tray™ according to directions on package.
2. In a large bowl mix softened cream cheese, CANDIQUIK® and cheesecake pudding until well blended. Fold in whipped topping, half of the container at a time and mix until well blended.
3. Mix in coffee liqueur and Land O’Lakes® Amaretto and Chocolate hot cocoa mix.
4. Carefully spoon mixture into ladyfinger pie crust.
5. Top with whipped topping. Sprinkle with unsweetened cocoa. Keep refrigerated.
1. Melt both packages of CANDIQUIK® Coating in Melt and Make Microwaveable Trays™ according to directions on package. Set Chocolate CANDIQUIK® aside.
2. In a large bowl, beat 2 packages of softened cream cheese, melted Vanilla CANDIQUIK® Coating, and both packages of “Mint and Chocolate” hot cocoa mix; mix until well blended.
3. Fold in 1 container of whipped topping and mix until well blended.
4. Carefully spoon half of mint chocolate mixture into one crust and half into the other crust; set aside.
5. In another large bowl, beat remaining 2 packages of cream cheese, melted Chocolate CANDIQUIK® Coating, and chocolate pudding powder; mix until well blended.
6. Fold in remaining container of whipped topping and mix until well combined.
7. Carefully spoon half of chocolate mixture on top of mint filling in one crust and half into the other crust.
8. Refrigerate until ready to serve. Garnish as desired.
1. Prepare and bake cake mix as directed on box, using two 8″ round pans. Cool completely.
2. Melt CANDIQUIK® Coating in Melt and Make Microwaveable Tray™ according to directions on package.
3. In a large bowl, beat softened cream cheese, melted CANDIQUIK® and instant cheesecake pudding until well blended. Add whipped topping, half of the container at a time and mix until well blended.
4. Cut both cakes in half horizontally (yielding 4 cakes total). Place two halves on separate plates.
5. Carefully spread half of the cheesecake mixture on top of the two cakes.
6. Layer remaining cake halves on top of cheesecake layers.
7. Carefully spread remaining half of the cheesecake mixture on top of cakes. Keep refrigerated.
2. Melt CANDIQUIK® Coating in Melt and Make Microwaveable Tray™ according to directions on package.
3. Dip about 3/4 of each strawberry in melted CANDIQUIK®Coating; place on wax paper until set.
4. Break off a side piece of a pretzel twist to create swan’s neck. Dip pretzel piece in melted CANDIQUIK® Coating; place on wax paper until set.
5. Cut off the yellow part of candy corn; cut orange and white piece in half. Attach one of the halves to curved end of dipped pretzel piece with a small dab of CANDIQUIK® Coating.
6. Attach other end of the dipped pretzel piece to the strawberry with a small dab of CANDIQUIK® Coating.
1. Prepare an 8×8″ pan by lining with aluminum foil and coating with nonstick spray.
2. Melt 1 package of CANDIQUIK® in Melt and Make Microwaveable Tray™, as directed on package.
3. Place marshmallow creme in a medium mixing bowl and microwave for 15 seconds to slightly soften.
4. Pour the chocolate CANDIQUIK® on top of the marshmallow creme and use a spoon to stir together.
5. Spoon mixture into prepared pan and smooth evenly across the bottom (mixture will be thick). Place in the freezer for 30-45 mintues until firm.
6. Melt remaining package of Chocolate CANDIQUIK®.
7. Remove from freezer and cut into 2″ bars. Dip each bar in the tray of CANDIQUIK® and place on wax paper to set.
*TIP: to dip the bars, place each bar on a fork and lower into the CANDIQUIK®, use a spoon to completely cover the bar; let the excess coating drip off and place on wax or parchment paper to set.
(Three Musketeers is a registered trademark of HERSHEY’S)
1. Divide coconut evenly into 4 plastic bags; add food colorings to individual bags of coconut. Shake bags until coconut is evenly colored.
2. Cut chocolate discs in half to use as mouths.
3. Prepare the beaks by cutting yellow gum drops into a triangular shape, slit open. Cut small triangular shapes out of the Fruit Roll-Up® and attach to gum drop as a tongue.
4. Melt both packages of Vanilla CANDIQUIK® in Melt and Make Microwaveable Tray™ according to the package directions. Divide into 4 separate bowls. Stir in the 4 food colorings in individual bowls until desired colors are established.
5. Insert a lollipop stick into each cake ball; divide cake pops into 4 even groups.
6. Dip cake pops into melted CANDIQUIK®; allow excess coating to drip off. Before coating is set, attach half of a chocolate disc as the mouth (or yellow candy as beak) and candy eyes; sprinkle with the matching colored coconut.
Tip: Complete 1 group of the same colored characters at a time. Place in Styrofoam block to set.
TIPS:
· Oscar: Re-shape the cake ball to form a “C” shape as an opening for his mouth; cut the chocolate disc in half and use both pieces to form an open mouth. Use a red heart sprinkle as his tongue. When dry, use a brown icing or chocolate candy coating to pipe on eyebrows.
· Cookie Monster: Attach a butterscotch baking chip to his mouth as a cookie (cut off top of chip and use edible ink pen to dot on “chocolate chips”).
· Elmo: Attach an orange jelly bean as his nose.
· If CANDIQUIK® Coating begins to harden or thicken while dipping cake pops, reheat in the microwave in 15 second
increments. Be careful not to overheat.
· To thin coating, add a tablespoon of solid vegetable shortening and stir until well mixed.
· If cake balls start to fall off the lollipop stick or get gooey when dipping, place remaining cake balls in the refrigerator for an additional 20-30 minutes.
2. Whisk together the flour, baking soda, baking powder, and salt; set aside.
3. With an electric mixer, cream the butter, sugar and peanut butter together until pale and fluffy. Add the eggs, one at a time, beating until each is well incorporated. Reduce speed to low and mix in greek yogurt and vanilla extract.
4. Gradually add the flour mixture; beat until just combined. Pour batter into a greased 13 x 9” pan.
5. Bake approximately 28 minutes or until edges are golden brown. Let cool.
6. Once cool, crumble cake into a large bowl. Add frosting and mix thoroughly.
7. Roll mixture into 1” balls and place in the refrigerator until firm (approximately 30 minutes).
8. Remove mixture and use a wooden dowel to create a deep hole in the center of each cake ball; reserving 5 cake balls. Using a toothpick or small measuring spoon, spoon a small amount of jam into each hole.
9. Using the reserved cake balls, pinch a small amount off and use your fingers to smooth it over and seal the hole that is filled with jam. Place the jam-filled cake balls in the freezer for 15 minutes.
10. Melt CANDIQUIK® in Melt and Make Microwaveable Tray™ according to package directions. Once melted, stir in 1 1/2 tablespoons of peanut butter into each package of coating. Transfer the CANDIQUIK® into a deep bowl.
11. Remove cake balls from freezer and dip the tip of the bamboo toothpick into the CANDIQUIK® and insert about 1/3 of the way into the cake ball. Dip cake pop immediately in the CANDIQUIK®, removing promptly. Allow excess coating to
drip off and set on wax paper to dry completely.
1. Prepare and bake cake mix as directed on box; cool completely.
2. Crumble cake into a large bowl. Add frosting and mix thoroughly.
3. Roll mixture into 1″ sized balls. Chill for approximately 1-2 hours in the refrigerator.
4. Melt CANDIQUIK® Coating in Melt and Make Microwaveable Tray™ according to directions on package.
5. Insert a lollipop stick into each cake ball and press two peanuts on the top of the cake pop as ears. Dip cake pops in Vanilla CANDIQUIK®; allow excess coating to drip off.
6. Before coating is dry, press a pink colored M&M® on the center of the cake pop as a nose and place in the Styrofoam block to set. Optional: attach 2 Nerds® candies between ears as horns.
7. Melt Chocolate CANDIQUIK® in Melt and Make Microwaveable Tray™ according to directions on package.
8. Use a toothpick dipped in Chocolate CANDIQUIK® to draw spots on the cake pop. Using the edible marker, draw two dots for the eyes and nostrils. Return to Styrofoam block to dry.
TIP: If cake balls become too soft or are not holding their shape while being dipped, place back in the refrigerator for 20-30 minutes.
1. Prepare and bake cake mix as directed on box; cool completely.
2. Crumble cake into a large bowl. Add frosting and mix thoroughly.
3. Roll mixture into 1″ sized balls. Chill for approximately 1-2 hours in the refrigerator.
4. Melt Vanilla CANDIQUIK® in Melt and Make Microwaveable Tray™ according to directions on package. Add orange food coloring until a deep orange color is established.
5. Dip cake balls in CANDIQUIK® and place on wax paper to set.
6. Melt Chocolate CANDIQUIK® in Melt and Make Microwaveable Tray™ according to directions on package. Pour into a piping bag (or plastic bag with a tiny corner snipped off) and pipe on basketball lines.
TIP: If cake balls become too soft or are not holding their shape while being dipped, place back in the refrigerator for 20-30 minutes.
1. Chop 1 package of CANDIQUIK® into small pieces, set aside.
2. In a medium sized pan, heat 1/3 cup milk over medium-low heat, until simmering. Once simmering, add chopped CANDIQUIK® and stir constantly until melted.
3. Pour CANDIQUIK® mixture into a medium bowl; place in refrigerator until completely cooled and “fudgy”.
4. Shape mixture into 1″ sized balls. With your thumb, make an indent in the ball and press 2 small marshmallows (or 1/2 of a large marshmallow) into the center. Mold chocolate around the marshmallows to form a ball again and place on wax paper.
5. Melt remaining package of CANDIQUIK® in Melt and Make Microwaveable Tray™ according to directions on package.
6. With a spoon, coat balls completely in CANDIQUIK® and place on wax paper; sprinkle with graham cracker crumbs before chocolate is set.
TIP: If truffles become too soft or are not holding their shape while being dipped, place back in the refrigerator for 20-30 minutes.
1. Mix cookies, pretzel twists, candy corn and peanuts in medium bowl.
2. Melt CANDIQUIK® Coating in Melt and Make Microwaveable Tray™ according to directions on package. Add orange food coloring to create an orange coating.
3. Add CANDIQUIK® Coating to cookie mixture; blend until coated.
4. Spread mixture about 3/4-inch thick on wax paper; let set until dry.
For Bears:1. Prepare and bake cake mix as directed on box; cool completely.
2. Crumble cake into a large bowl. Add frosting and mix thoroughly.
3. Use fingers to shape cake ball mixture into a bear head (use a picture as a guide if necessary). Stick 2 almonds into the sides of the cake ball as ears. Chill for approximately 1-2 hours in the refrigerator.
4. Break off 2 squares (4 oz) of Vanilla CANDIQUIK®; set aside. Melt remaining CANDIQUIK® in Melt and Make Microwaveable Tray™ according to the package directions. Add a couple drops of yellow food coloring (oil or powder based) to produce an off-white/tan color.
5. Insert a lollipop stick into each cake ball. Dip cake pops in CANDIQUIK®; allow excess coating to drip off. Place in Styrofoam block to set.
6. Once dry, use a toothpick dipped in Vanilla CANDIQUIK® to draw the outline of eyes. Use the black cake decorating gel or edible marker to draw on mouth, nose, and pupils. Attach a red heart sprinkle as the tongue.
7. Melt Chocolate CANDIQUIK® in Melt and Make Microwaveable Tray™ according to the package directions.
8. To add the brown “fur” trim; carefully dip the back of the bear cake pop in the Chocolate CANDIQUIK and slowly roll the cake pop around, coating all edges. Allow excess coating to drip off and return to Styrofoam block to set.
Baseball Caps:
1. Melt the remaining 4 oz of Vanilla CANDIQUIK®. Add blue (oil or powder based) food coloring. Spoon small, round dots onto wax paper (bills of the hat).
2. For the dome of the hats, chop a round candy in half; insert a toothpick into candy and dip in the blue CANDIQUIK®. Quickly attach the dome of the hat towards the back of the bill. Once set, use a dab of CANDIQUIK® and attach to cake pop.
For Baseballs:
Please see ‘Baseball Cake Pop’ recipe
1. Prepare and bake cake mix as directed on box; cool completely.
2. Crumble cake into a large bowl. Add frosting and mix thoroughly.
3. Roll mixture into 1″ sized balls. Chill for approximately 1-2 hours in the refrigerator.
4. Melt CANDIQUIK® Coating in Melt and Make Microwaveable Tray™ according to directions on package. Add orange food coloring (oil or powder based only) to CANDIQUIK® until desired color is established.
5. Insert a lollipop stick into each cake ball. Dip cake pops in Vanilla CANDIQUIK®; allow excess coating to drip off. Place in Styrofoam block.
6. Before coating is set, attach leaf sprinkles and 3 triangular shaped sprinkles as the eyes and nose. Once dry, use the black Gourmet Writer to draw the mouth.
TIP: If cake balls become too soft or are not holding their shape while being dipped, place back in the refrigerator for 20-30 minutes.
1. Prepare and bake cake mix as directed on box; cool completely.
2. Crumble cake into a large bowl. Add frosting and mix thoroughly.
3. Roll mixture into 1″ sized balls. Chill for approximately 1-2 hours in the refrigerator.
4. Melt CANDIQUIK® Coating in Melt and Make Microwaveable Tray™ according to directions on package. Add pink food coloring (oil or powder based only) until desired color is established.
5. Chop each jelly bean in half (the long way), these will be the ears. Press two jelly bean pieces on top of the
cake ball as ears.
6. Insert a lollipop stick into each cake ball. Dip cake pops in CANDIQUIK®; allow excess coating to drip off.
7. Before dry, press a pink colored M&M® on the center of the cake pop. Place in Styrofoam block to dry.
8. Once dry, draw eyes and nostrils using the edible marker or black icing.
TIP: If cake balls become too soft or are not holding their shape while being dipped, place back in the refrigerator for 20-30 minutes.
1. Melt one package of Vanilla CANDIQUIK® Coating in Melt & Make™ Microwaveable Tray according to the package directions.
2. In a large bowl, with an electric mixer, blend melted CANDIQUIK® with softened cream cheese, dry pudding mix, and raspberry extract until smooth.
3. Cover and place mixture in the freezer for 2-3 hours or until firm.
4. Remove mixture from freezer. Spread flour on a baking sheet. Roll mixture into 1” balls. Return to freezer until firm.
5. Melt second package of Vanilla CANDIQUIK® Coating in Melt & Make™ Microwaveable Tray according to the package directions.
6. Remove cheesecake balls from the freezer and insert a lollipop stick into the middle of each ball. Holding the end of the stick, dip each pop into the CANDIQUIK® Coating. Allow excess coating to drip off and place on wax paper. Decorate as desired.
TIPS:
Remove only a few pops at a time from the freezer to dip, keeping the others in the freezer until needed.
If cheesecake pops start to stick or get gooey when dipping, return to freezer until firm.
1. Bake key lime bars according to directions. Allow to slightly cool.
2. Place key lime filling, crust, and whipped topping in a large bowl. Using an electric mixer, mix on high speed until mixture is thick and creamy. Chill mixture 1-2 hours.
3. Melt Vanilla CANDIQUIK® in Melt and Make Microwaveable Tray™ according to the package directions.
4. Spoon a small amount of CANDIQUIK® into the candy mold, pushing it up the sides to completely coat the inside (but leaving enough room for your key lime mixture). Allow to set.
5. Once coating inside the mold is set, spoon key lime mixture into the mold, filling to the top. Immediately spoon more CANDIQUIK® on top, smoothing to the sides of the mold so the key lime mixture is completely covered.
6. Before coating sets, insert lollipop stick in the middle of the mold and softly push down.
7. Place candy mold in refrigerator to set. Once completely set, gently remove key lime pops out of the candy mold.
1. Melt CANDIQUIK® Coating in Melt & Make™ Microwaveable Tray according to directions on package.
2. Spoon a small amount of coating into each heart mold and decorate with sprinkles before dry. Let set.
3. Once set, remove from mold. Using a dab of CANDIQUIK®, attach the chocolate heart to one end of a pretzel stick.
4. Cut gumdrop candies (vertically) into four pieces. Use a dab of CANDIQUIK® to attach two pieces of the gumdrop to the back end
of the pretzel stick, forming an arrow.
1. Prepare and bake cake mix as directed on box; cool completely.
2. Crumble cake into a large bowl. Add frosting and mix thoroughly.
3. Roll mixture into 1″ sized balls. Chill for approximately 1-2 hours in the refrigerator.
4. Melt CANDIQUIK® Coating in Melt and Make Microwaveable Tray™ according to directions on package.
5. Insert a lollipop stick into each cake ball. Dip cake pops in Vanilla CANDIQUIK®; allow excess coating to drip off.
6. To decorate cats: (before coating is set) press a heart-shaped sprinkle on as the nose and 2 triangular sprinkles as the ears. Once dry, draw on eyes, mouth and whiskers with white writing icing or melted Vanilla CANDIQUIK®.
TIP: If cake balls become too soft or are not holding their shape while being dipped, place back in the refrigerator for 20-30 minutes.
1. Prepare and bake cake mix as directed on box; cool completely.
2. Crumble cake into a large bowl. Add frosting and mix thoroughly.
3. Roll mixture into 1″ sized balls. Chill for approximately 1-2 hours in the refrigerator.
4. Melt CANDIQUIK® Coating in Melt & Make™ Microwaveable Tray according to directions on package. (If desired, add oil or powder based food
coloring to Vanilla CANDIQUIK®; stir until blended.)
5. Insert a lollipop stick into each cake ball. Dip cake pops in CANDIQUIK®; allow excess coating to drip off. Decorate with sprinkles. Place in Styrofoam block to set.
TIP: If cake balls become too soft or are not holding their shape while being dipped, place back in the refrigerator for 20-30 minutes.
1. Prepare and bake cake mix as directed on box; cool completely.
2. Crumble cake into a large bowl. Add frosting and mix thoroughly.
3. Roll mixture into 1 1/2″ sized ovals. Chill for approximately 1-2 hours in the refrigerator.
4. Prepare the wings ahead of time by melting the Vanilla CANDIQUIK® Coating in Melt and Make Microwaveable Tray™ according to directions on package. With a teaspoon, carefully spoon small circular drops of the coating onto wax paper. Make two “wings” for each cake pop.
5. Insert a lollipop stick into each cake ball. Re-melt CANDIQUIK® until smooth and then add yellow food coloring (oil or powder based only) until desired color is established.
6. Dip cake pops in melted CANDIQUIK®; let excess CANDIQUIK® drip off and place in a Styrofoam block to set.
7. Before dry, carefully attach two brown jimmies on the front of the cake pop for the antennas.
8. Once dry, use a black writinc icing to pipe on the stripes.
9. Cut a straight edge on each wing (so it pushes flat against the cake pop), dip the flat edge of the wings into the CANDIQUIK®, then carefully attached it to the cake pop, holding the wings in place until the coating sets.
10. Draw on face with the writing icing.
TIP: If cake bites become too soft or are not holding their shape while being dipped, place back in the refrigerator for 20-30 minutes.
1. Prepare and bake cake mix as directed on box; cool completely.
2. Crumble cake into a large bowl. Add frosting and mix thoroughly.
3. Roll mixture into 1″ sized balls. Chill for approximately 1-2 hours in the refrigerator.
4. Prepare the ears by chopping each jelly bean in half (vertically).
5. Melt CANDIQUIK® Coating in Melt and Make Microwaveable Tray™ according to directions on package.
6. Insert a lollipop stick into each cake ball. Press 2 jelly bean halves on the top of the cake pop as ears. Dip cake pops in CANDIQUIK®; allow excess coating to drip off. Place in Styrofoam block to set.
7. Press a (brown) M&M® on the center of the cake pop as a nose before coating is completely set.
8. Once set, draw two dots with cake icing writer as eyes.
TIP: If cake balls become too soft or are not holding their shape while being dipped, place back in the refrigerator for 20-30 minutes.
1. Prepare and bake cake mix as directed on box; cool completely.
2. Crumble cake into a large bowl. Add frosting and mix thoroughly.
3. Roll mixture into 1″ sized balls. Chill for approximately 1-2 hours in the refrigerator.
4. Melt CANDIQUIK® Coating in Melt and Make Microwaveable Tray™ according to directions on package. Add a few drops of orange food coloring (oil or powder
based) until desired color is established.
5. Insert a lollipop stick into each cake ball. Dip cake pops in Vanilla CANDIQUIK®; allow excess coating to drip off. Place in Styrofoam block to set.
6. Once set, pipe on basketball pattern with black decorating gel.
1. Prepare and bake cake mix as directed on box; cool completely.
2. Crumble cake into a large bowl. Add frosting and mix thoroughly.
3. Roll mixture into 1″ sized balls. Chill for approximately 1-2 hours in the refrigerator.
4. Melt CANDIQUIK® Coating in Melt and Make Microwaveable Tray™ according to directions on package.
5. Insert a lollipop stick into each cake ball. Dip cake pops in Vanilla CANDIQUIK®; allow excess coating to drip off. Place in Styrofoam block to set.
6. Once set, pipe on baseball stitches with red decorating gel.
TIP: If cake bites become too soft or are not holding their shape while being dipped, place back in the refrigerator for 20-30 minutes.
1. Prepare and bake cake mix as directed on box; cool completely.
2. Crumble cake into a large bowl. Add frosting and mix thoroughly.
3. Roll mixture into 1″ sized balls. Chill for approximately 1-2 hours in the refrigerator.
4. Melt CANDIQUIK® Coating in Melt and Make Microwaveable Tray™ according to directions on package.
5. Insert a lollipop stick into each cake ball. Dip cake pops in melted CANDIQUIK®; allow excess coating to drip off and place in Styrofoam block to set.
6. Once dry, draw on faces with Gourmet Writer or cake writing icing. Apply shimmer powder to cheeks.
7. Wrap the baking cup around the cake pop and secure to the lollipop stick with ribbon or tape.
TIP: If cake balls become too soft or are not holding their shape while being dipped, place back in the refrigerator for 20-30 minutes.
1. Prepare and bake cake mix as directed on box; cool completely.
2. Crumble cake into a large bowl. Add frosting and mix thoroughly.
3. Roll mixture into 1″ sized balls. Chill for approximately 1-2 hours in the refrigerator.
4. While cake balls are cooling; decorate Teddy Grahams® with cake writing icing. Stretch a Life Saver® Gummy around the bear.
5. Melt Vanilla CANDIQUIK® Coating in Melt and Make Microwaveable Tray™ according to the package directions. Add blue food coloring (oil or powder based only) until desired color is established.
6. Dip cake balls in CANDIQUIK® and place on wax paper to set.
7. Before completely set, gently push Life Saver® Gummy and bear on top of the cake ball.
1. In a large bowl mix peanut butter, butter, powdered sugar and vanilla.
2. Roll the mixture into 1-inch sized balls and place on wax paper.
3. Melt CANDIQUIK® in Melt & Make™ Microwaveable Tray according to package directions.
4. With a spoon, coat each ball in CANDIQUIK® and place on wax paper to set. Decorate as desired.
TIP: If peanut butter balls become too soft or are not holding their shape while being dipped, place in the refrigerator for 20-30 minutes. For best taste, keep refrigerated.
1. Prepare and bake cake mix as directed on box; cool completely.
2. Crumble cake into a large bowl. Add frosting and mix thoroughly.
3. Roll mixture into 1″ sized balls. Chill for approximately 1-2 hours in the refrigerator.
4. Melt 1 package of Vanilla CANDIQUIK® Coating in Melt and Make Microwaveable Tray™ according to directions on package. Add a few drops of red food coloring (oil or powder based) until desired color is established.
5. Dip cake balls in CANDIQUIK® and place on wax paper to set.
6. Melt the remaining package of Vanilla CANDIQUIK®. Add a few drops of black food coloring (oil or powder based) until desired color is established.
7. Carefully dip half of each red cake ball in the black CANDIQUIK® and return to wax paper. Before the black coating is dry, press two confetti sprinkles on as eyes.
8. Once coating is dry, draw a straight line down the middle of the red coating with the cake writing icing. Draw black dots for the ladybug’s spots.
1. Prepare and bake cake mix as directed on box; cool completely.
2. Crumble cake into a large bowl. Add frosting and mix thoroughly.
3. Roll mixture into 1″ sized balls. Chill for approximately 1-2 hours in the refrigerator.
4. Carefully cut the top of the waffle cones off, so the cones measure approximately 2 ½ inches tall.
5. Melt CANDIQUIK® Coating in Melt and Make Microwaveable Tray™ according to directions on package.
6. Press a cake ball on top of the mini waffle cone. Dip the top of the cake ball into the CANDIQUIK® by holding the end of the cone. Place on wax paper with the cone pointing up, allowing the excess coating to form a puddle. Sprinkle.
TIP: If cake bites become too soft or are not holding their shape while being dipped, place back in the refrigerator for 20-30 minutes.
1. Prepare and bake cake mix as directed on box; add 8 tablespoons of ground coffee beans (or instant coffee) to cake mixture before baking. Cool cake completely.
2. Crumble cake into a large bowl. Add frosting and mix thoroughly.
3. Roll mixture into 1″ sized balls. Chill for approximately 1-2 hours in the refrigerator.
4. Melt CANDIQUIK® Coating in Melt and Make Microwaveable Tray™ according to directions on package.
5. Dip cake balls in CANDIQUIK® and place on wax paper to set. Top each cake ball with an espresso bean before coating is dry.
1. Prepare and bake cake mix as directed on box; cool completely.
2. Crumble cake into a large bowl. Add frosting and mix thoroughly.
3. Roll mixture into 1″ sized balls. Chill for approximately 1-2 hours in the refrigerator.
4. Melt CANDIQUIK® Coating in Melt and Make Microwaveable Tray™ according to directions on package.
5. Dab a small amount of CANDIQUIK® on top of the peanut butter cup and press a cake ball on top, let set.
6. Dip the top of the cake ball into the CANDIQUIK® by holding the end of the peanut butter cup. Slowly pull out and allow most of the excess CANDIQUIK® to drip off; sprinkle and top with a chocolate chip.
TIP: If cake bites become too soft or are not holding their shape while being dipped, place in the refrigerator for 20-30 minutes.
1. Heat corn syrup in saucepan over medium heat until simmering, stirring frequently.
2. In a medium bowl, mix heated corn syrup with shredded coconut, vanilla and salt. Mixture will be thick and sticky.
3. With hands, form coconut mixture into 1-inch balls, packing firmly. Place on a wax paper lined baking sheet. Chill coconut balls in the freezer for 20-30 minutes.
4. Melt Chocolate CANDIQUIK® Coating in Melt & Make™ Microwaveable Tray according to directions on the package.
5. Dip coconut balls in the Chocolate CANDIQUIK®; place on wax paper to set.
6. Garnish with shredded coconut before coating is set.
TIP: If coconut balls become too soft or are not holding their shape while being dipped, place back in the refrigerator for 20-30 minutes.
1. Prepare and bake cake mix as directed on box; cool completely.
2. Crumble cake into a large bowl. Add frosting and mix thoroughly.
3. Roll cake mixture into 1” sized balls; pinching the top with your fingers to form a pointy peak. Chill for approximately 1-2 hours in the refrigerator.
4. Melt CANDIQUIK® Coating in Melt & Make™ Microwaveable Tray according to directions on package.
5. Dip cake balls in melted Chocolate CANDIQUIK®; place on wax paper to set.
6. Cut small (approx. 4.5”) square pieces of aluminum foil and wrap around each individual cake ball.
7. Cut thin strips of paper to write (or type) notes on. Secure paper notes by tucking into the aluminum foil wrapper, allowing the top 2” to stick out.
TIP: If cake balls start to get gooey or lose their shape when dipping, place in the refrigerator for an additional 20-30 minutes.
1. Beat softened cream cheese with a mixer until creamy.
2. Melt 1 package of Chocolate CANDIQUIK® in Melt and Make Microwaveable Tray™ according to directions on package.
3. Mix Chocolate CANDIQUIK® with the cream cheese until well blended. Cover mixture and place in the freezer for 30 minutes-1 hour.
4. Roll mixture into 1″ sized balls on a wax paper lined baking sheet. (Tip: dust the baking sheet with flour to prevent mixture
from sticking). Place chocolate balls in the freezer for an additional 20-30 minutes prior to dipping.
5. Melt the remaining package of CANDIQUIK® in Melt and Make™ Microwaveable Tray according to the directions on the package.
6. With a spoon, dip balls in CANDIQUIK® and place on wax paper to set. Decorate with sprinkles before coating is set. Keep refrigerated in a sealed container.
TIP: If balls become too soft or do not hold their shape while being dipped, return to the freezer for an additional 10 minutes or until firm.
1. Prepare and bake cake mix as directed on box; cool completely.
2. Crumble cake into a large bowl. Add frosting and mix thoroughly.
3. Roll mixture into 1″ sized balls. Chill for approximately 1-2 hours in the refrigerator.
4. Melt CANDIQUIK® Coating in Melt & Make™ Microwaveable Tray according to directions on package. Add yellow food coloring
(oil or powder-based only) until a light yellow color is established.
5. Dip cake balls in CANDIQUIK® and place on wax paper to set.
6. Before CANDIQUIK® has set, attach an orange Nerds® candy as the beak and two orange, flower-shaped sprinkles as the feet.
7. Insert two almond slices into the sides of the cake balls to form the wings.
8. Once set, draw two dots for eyes with writing icing.
TIP: If cake bites become too soft or are not holding their shape while being dipped, place in the refrigerator for 20-30 minutes.
1. Prepare and bake cake mix as directed on box; cool completely.
2. Crumble cake into a large bowl. Add frosting and mix thoroughly.
3. Chill mixture for approximately 1-2 hours in the refrigerator.
4. Roll mixture into medium sized balls, create an indent with your thumb and press a (dry) cherry into the center. Form the cake mixture around the cherry.
5. Melt CANDIQUIK® Coating in Melt & Make™ Microwaveable Tray according to directions on package.
6. Dip cake balls in CANDIQUIK® and place on wax paper to set. Decorate with sprinkles and/or CANDIQUIK® coating.
TIP: If cake bites become too soft or are not holding their shape while being dipped, place in the refrigerator for an additional 20-30 minutes.
1. Prepare and bake cake mix as directed on box; cool completely.
2. Crumble cake into a large bowl. Add frosting and mix thoroughly.
3. Roll mixture into 1″ sized balls.Chill for approximately 1-2 hours in the refrigerator.
4. Cut the edge of a marshmallow diagonally in the shape of bunny ears. These will form the bunny “ears.” Sprinkle with pink decors onto the sticky side of
the marshmallow (for best results, press the sticky side of the marshmallow into the sprinkles).
5. Melt CANDIQUIK® in Melt & Make™ Microwaveable Tray according to the directions on the package.
6. Dip cake balls in the Vanilla CANDIQUIK® and place on wax paper.
7. Before CANDIQUIK® has set, press the marshmallow ears on the top of the cake ball and place one heart-shaped sprinkle on the front of the cake ball for the nose.
8. Once dry, draw two dots for eyes with writing icing.
TIP: If cake bites become too soft or are not holding their shape while being dipped, place in the refrigerator for an additional 20-30 minutes.
1. Prepare stem and leaves of apple: break mini pretzels into small (3/4″) pieces. On a cutting board, carve leaf shapes out of the green fruit snack. Set aside.
2. Melt CANDIQUIK® Coating in Melt and Make Microwaveable Tray™ according to directions on package.
3. Add red food coloring (oil or powder based only) to CANDIQUIK® until desired color is established.
4. Dip each donut hole in CANDIQUIK®, allow excess coating to drip off; place on wax paper to set.
5. Before coating is set, attach 1 pretzel piece and two leaves on top of each donut hole.
1. Melt CANDIQUIK® Coating in Melt and Make Microwaveable Tray™ according to directions on package.
2. Place mini baking cups in mini muffin pan to add stability. Using a small spoon, coat inside of mini paper cups with melted CANDIQUIK® Coating. Spread coating evenly up the sides of cup, almost to the top, but not over the edge. Place in refrigerator
until set.
3. In a medium saucepan, combine butter and peanut butter. Cook over medium heat until melted, stirring occasionally. Stir in sugar and graham cracker crumbs.
4. Press a small amount of mixture into each cup, leaving room for the chocolate topping.
5. Spoon melted CANDIQUIK® Coating on top of peanut butter mixture; spread to cover entire top.
1. Melt CANDIQUIK® Coating in Melt and Make Microwaveable Tray™ according to directions on package.
2. If desired, add a few drops of oil-based food coloring to melted CANDIQUIK® Coating.
3. Place a small dab of CANDIQUIK® Coating on a marshmallow; place another marshmallow on top to create the bottle. Place on wax paper to set.
4. Dip the stacked marshmallows in CANDIQUIK® Coating.
5. Before coating is dry, place a colored candy kiss or gum drop on the top of the bottle. Sprinkle marshmallow bottles before coating is dry. Place on wax paper to set.
1. Melt CANDIQUIK® Coating in Melt and Make Microwaveable Tray™ according to directions on package.
2. Pour a teaspoon of CANDIQUIK® into mini cupcake liner. With the back of a small spoon, push the coating up the sides of the cupcake liner (to stablize the cupcake liners, place in muffin pan).
3. Pour crumbled graham crackers onto the bottom, filling about half of the shell.
4. Once coating has set, spoon a teaspoon of pie filling on top of the graham crackers, slightly overfilling the cupcake liner.
5. Spoon a small amount of CANDIQUIK® over the pie filling and smooth to the edges to completely cover apples.
6. Once completely set, decorate as desired. Tear back cupcake liner when ready to eat.
*This recipe is courtesy of Club CandiQuik member, Debbie K!
1. In large saucepan melt butter over low heat. Add marshmallows and stir until completely melted. Remove from heat.
2. Add Rice Krispies® cereal. Stir until well coated. Let cool 5-10 minutes.
3. On wax paper, mold mixture into the shape of a lobster, forming 2 main parts: the body and the tail.
4. Melt Vanilla CANDIQUIK® Coating in Melt and Make Microwavable Tray™ according to directions on package. Add red food coloring (oil or powder based) until desired color is established.
5. Coat each rice crispy in CANDIQUIK® and push the tail and body together on wax paper.
6. Attach 2 M&M®’s for the eyes before coating is set.
7. Coat 1 orange slice wedge candy in CANDIQUIK® and attach to the end of the lobster as the tail.
8. Break pretzel rod in half, coat completely in CANDIQUIK® and press on the front sides of the lobster. Coat 2 fortune cookies in CANDIQUIK® and press on the front of the pretzel rods as pinchers.
9. Once set, cut licorice strings into (8) 3” pieces for each lobster. Place 3 pieces on each side of the lobster’s belly for legs and 2 pieces on the front, as antennae.
1. Melt CANDIQUIK® Coating in Melt and Make Microwaveable Tray™ according to directions on package.
2. Insert a toothpick into the middle of the marshmallow and dip diagonally on each side to create the chocolate “V”. (Leaving the center of marshmallow uncoated for chest of graduate.) Place this dipped marshmallow on top of a pretzel twist.
3. Dip the top (1/2 inch) of another marshmallow in Chocolate CANDIQUIK® and sprinkle with brown sprinkles (or mini chocolate chips) to create “hair”. Place on wax paper to set. Decorate the face and gown of each graduate using a toothpick dipped in Chocolate CANDIQUIK®.
4. Using a dab of CANDIQUIK®, attach the (head) marshmallow on top of the (body) marshmallow.
5. Once set, affix the graduation cap (*see instructions here) on top of the graduate with a dab of CANDIQUIK®.
1. Melt CANDIQUIK® Coating in Melt and Make Microwaveable Tray™ according to directions on package.
2. Insert a toothpick into the middle of the marshmallow and dip the marshmallow diagonally on each side to create the chocolate “V”. Set on wax paper to dry.
3. To attach the beak, place a dab of chocolate CANDIQUIK on the candy corn and position on the marshmallow, hold in place until set.
4. Once dry, place two (orange) sour patch kid candies on wax paper as the feet. Place a dab of CANDIQUIK on the candies and press the marshmallow penguin on top.
5. Using the white cake writing icing, draw two dots for the eyes.
6. Place another dab of CANDIQUIK on the top of the marshmallow penguin and attach the graduation cap candy (*see graduation cap instructions here).
1. Using a sharp knife, carve out the center (hull) of each strawberry, as deep as you can without carving out the bottom.
2. Melt 1 package of Vanilla CANDIQUIK® Coating in Melt and Make Microwaveable Tray™ according to package directions. Dip each strawberry in CANDIQUIK®, covering about half of the berry. Sprinkle with blue sugar decors before coating is dry. Place on wax paper to set.
3. For Cheesecake: Melt remaining package of Vanilla CANDIQUIK® Coating in Melt and Make Microwaveable Tray™ according to package directions.
4. In a medium bowl, blend softened cream cheese, cheesecake pudding powder and melted Vanilla CANDIQUIK® until smooth. Add the
whipped topping, 1/2 container at a time, and mix until well blended.
5. Spoon the cheesecake mixture into a piping bag (or a plastic bag with one corner snipped off) and pipe the cheesecake into each strawberry, slightly overfilling.
6. Refrigerate until ready to serve.
*For best results, prepare strawberries with cheesecake immediately before serving.
1. Melt Vanilla CANDIQUIK® Coating in Melt and Make Microwavable Tray™ according to directions on package. Add red food coloring (oil or powder based) until desired color is established.
2. Dip tops of cracker in CANDIQUIK®; place (dipped side up) on wax paper until dry. Before dry, place 2 M&M’s on every other cracker for the eyes.
3. Cut licorice strings approximately 3” long.
4. Spread peanut butter on un-coated side of cracker. Arrange 4 red licorice pieces across the peanut butter, hanging out the sides to form
the crab’s legs. Use a dab of CANDIQUIK® to attach an almond slice to each of the front legs.
5. Put a dab of peanut butter on the dipped crackers with eyes and place on top of the licorice strings.
1. Prepare and bake brownie mix as directed on box; set aside to cool.
For Cheesecake Layer:
1. Melt Vanilla CANDIQUIK® in Melt and Make Microwaveable Tray™ according to directions on package.
2. In a large bowl, beat cream cheese, CANDIQUIK® and cheesecake pudding with an electric mixer until well blended. Add whipped topping, half of the container at a time, and mix until well blended.
3. Spread cheesecake evenly over brownies. Keep refrigerated.
1. In a large bowl, gradually mix the powdered sugar with the softened cream cheese, stir until well incorporated. (Use a spoon or a standing mixer for best results)
2. Add peppermint extract and combine well.
3. Roll dough into tablespoon sized balls. Place in an airtight container and refrigerate for an hour or until firm.
4. Once peppermints have firmed, create a small indention in the middle of each ball using a 1/2 teaspoon or your thumb.
5. Melt Chocolate CANDIQUIK® in Melt and Make™ Microwaveable Tray according to package directions. Using a spoon (or a piping bag/plastic freezer bag with the corner snipped), fill each mint with CANDIQUIK®. Let cool.
*Keep refrigerated in an airtight container to prevent mints from drying out.
1. Prepare flames by cutting fruit rolls into small (1″) flame-shaped pieces.
2. Prepare and bake cake mix as directed on box; cool completely.
3. Crumble cake into a large bowl. Add frosting and mix thoroughly.
4. Roll mixture into 1″ sized balls. Chill for approximately 1-2 hours in the refrigerator.
5. Chop the top of the waffle cones off, so the cones measure approximately 2 ½ inches tall.
6. Melt CANDIQUIK® Coating in Melt and Make Microwaveable Tray™ according to directions on package. Stir in orange food coloring until desired color is established.
7. Press a cake ball on top of the mini waffle cone. Dip the top of the cake ball into the CANDIQUIK by holding the end of the cone. Allow the excess coating to drip off.
8. Quickly apply the flame-shaped fruit pieces, beginning at the base and working towards the top of the cone. If the coating dries before all the flames are attached, use a toothpick to add more coating to the cone.
9. Stick cones into a Styrofoam block to set completely.
Note: this cake pop recipe will yield approximately 40 cake balls; it is suggested to reserve some of the cake balls for another project.
1. Form pie crust into a 13×9” glass baking pan, bake as directed.
2. Melt CANDIQUIK® Coating in Melt and Make Microwaveable Tray™ according to directions on package.
3. In a large bowl, mix softened cream cheese, berry flavored gelatin, and Vanilla CANDIQUIK® with an electric mixer until well blended.
4. Fold in whipped topping and mix until well blended.
5. Carefully spoon mixture into glass baking pan and smooth out with a spatula.
6. Cut the string of the candy necklaces so you have one long string of candy; tie a small piece of ribbon on the ends so the candy pieces do not fall off. String candy necklaces evenly across the cake; you should have approximately 1.5” between each candy necklace.
7. Place white chocolate squares at the end of the cake, between the candy necklaces.
2. In large bowl, mix cake mix, vanilla, butter and eggs with spoon until a thick dough forms. Fold in vanilla chips.
3. On a greased (or nonstick) baking sheet, drop dough by teaspoonful, leaving about 2 inches apart.
4. Bake 7 to 9 minutes. Slide from baking sheet onto a cooling rack.
5. Melt CANDIQUIK® Coating in Melt & Make™ Microwaveable Tray according to directions on package.
6. Spread a teaspoon of CANDIQUIK onto the flat side of one cookie and press together with another cookie, allowing the Vanilla CANDIQUIK® to squeeze out the sides; sprinkle with nonpareils.
1. Melt Chocolate CANDIQUIK® in Melt and Make Microwaveable Tray™ according to package directions.
2. Using two utensils (I used a fork and spoon), completely cover Nutter Butter cookies in CandiQuik, let excess coating drip off and place on wax paper.
3. Before coating has set, press 1 butterscotch candy on the end of the cookie as a nose and 2 eye-shaped candies towards the top of the cookie; allow to dry.
4. Once dry, dip the very ends of 2 almond slices in the CandiQuik and press on the top of the cookie, hold until set in place.
5. Melt Vanilla CANDIQUIK® according to the package directions and use a toothpick to add facial markings (stripes/stars, etc.); allow to dry.
6. Using a toothpick and Vanilla CANDIQUIK®, carefully draw on the bridle; sprinkle immediately. (TIP: should only take 3 moves: 1 strip across the nose and 2 on either side of the cookie)
Nutter Butter is a registered trademark of Nabisco.
1. Melt CANDIQUIK® in Melt & Make™ Microwaveable Tray according to package directions.
2. Spoon a small amount of CANDIQUIK® Coating into the silicon cup; push the coating up the sides of the baking cup with the back of a spoon. Bring the coating almost to the top of the cup, but not over the edge. Repeat with all remaining cups; let dry.
3. Once completely set, carefully peel the silicon baking cups away from the CANDIQUIK® coating and fill with candy.
1. Prepare and bake cake mix as directed on box; cool completely.
2. Crumble cake into a large bowl. Add frosting and mix thoroughly.
3. Roll mixture into 1″ sized balls. Chill for approximately 1-2 hours in the refrigerator.
4. Melt both packages of CANDIQUIK® Coating in Melt and Make Microwaveable Tray™ according to directions on package. Add green food coloring (oil or powder based) to 1 of the packages.
5. Dip cake balls in CANDIQUIK®, alternating between colors and place on wax paper to set.
6. Decorate with sprinkles and/or drizzle with the opposite color of CANDIQUIK® Coating.
TIP: If cake bites become too soft or are not holding their shape while being dipped, place back in the refrigerator for 20-30 minutes.
BALLOON METHOD:
1. Melt CANDIQUIK® Coating in Melt and Make Microwaveable Tray™ according to directions on package.
2. Inflate each balloon to approximately 4” diameter.
3. Dip balloons in CANDIQUIK® and gently rock, forward and backwords, then left and right, ensuring that the balloons are well coated. Allow excess coating to drip off.
4. Set balloons, chocolate-side up in mugs and place in refrigerator until very firm.
5. Create bases by pouring 2” circles of CANDIQUIK® onto wax paper. Let set.
6. To remove chocolate bowls from balloons, gently prick the balloon with a pin and allow it to slowly deflate, carefully pealing the balloon from the chocolate as it deflates.
7. Use a dab of CANDIQUIK® to attach the bowl to the base.
1. Place coconut and a few drops of red & yellow food coloring in a plastic bag. Shake until all coconut is colored dark red.
2. Melt one package of Vanilla CANDIQUIK® Coating in Melt and Make Microwaveable Tray™ according to directions on package. Stir in a few drops of green (oil or powder based only) food coloring.
3. Dip Nilla Wafer® cookie in green CANDIQUIK®; place on wax paper.
4. Dip 12 marshmallows in green CANDIQUIK®; place in the center of the cookie. Use yellow icing to create a buckle and hat band.
Set hat aside.
5. Melt remaining package of CANDIQUIK® in Melt and Make Microwaveable Tray™ according to directions on package.
6. Insert pretzel sticks into remaining 12 marshmallows and dip in Vanilla CANDIQUIK®; allow excess coating to drip off. Sprinkle red coconut onto marshmallow, leaving a small opening for the face. Place on wax paper to set.
7. Once set, create faces with writing icing.
8. Attach the hat to leprechaun head with a small dab of melted CANDIQUIK® Coating.
*Optional: To create leprechauns with bodies and feet, you will need 12 additional marshmallows. Dip marshmallows
in green melted CANDIQUIK® and set on top of pretzel twist. Attach head and hat to the marshmallow ‘body’ with a dab of CANDIQUIK®.